Lightened-Up No-Bake Smores Icebox Cake: Easy 10-Minute Recipe
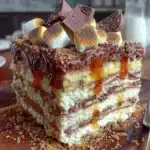
This Lightened-Up No-Bake S’mores Icebox Cake is exactly what it sounds like: all the campfire nostalgia, none of the guilt or the heat. It’s rich, creamy, and deeply satisfying, but made with smarter ingredients and about ten minutes of hands-on effort.
- Prep Time: 10 minutes
- Cook Time: 0 minutes
- Total Time: 6 hours 10 minutes (includes chilling)
- Yield: 12 servings 1x
- Category: Dessert
- Cuisine: American
Ingredients
Scale
- 1 ½ cups chocolate wafer crumbs (about 20–25 wafers)
- 3 tablespoons unsalted butter, melted
- 1 tablespoon maple syrup (optional)
- 1 ½ cups marshmallow fluff
- ½ cup plain Greek yogurt (full-fat or 2%)
- 1 teaspoon vanilla extract
- Pinch of salt
- 2 cups light whipped topping (like Cool Whip Lite)
- ¼ cup powdered sugar
- ½ teaspoon vanilla extract
- 1 cup crushed graham crackers (about 6–8 full sheets)
- ¼ cup mini chocolate chips (optional)
- 10–12 large marshmallows (for toasting, optional)
Instructions
- Make the chocolate crust. In a food processor, pulse the chocolate wafers until they become fine crumbs. You should have about 1 ½ cups. Transfer to a medium bowl, add the melted butter and maple syrup, and stir until the mixture looks like wet sand. Press this firmly into the bottom of your springform pan. Use the bottom of a glass or measuring cup to really pack it down. Set aside.
- Prepare the marshmallow cream layer. In a clean bowl, combine the marshmallow fluff, Greek yogurt, vanilla extract, and a pinch of salt. Whisk until smooth and creamy. It should be thick but spreadable. If it’s too stiff, add a teaspoon of milk or water to loosen it up. Spread this evenly over the chocolate crust. Pop the pan in the fridge while you make the next layer.
- Whip up the topping. In another bowl, combine the light whipped topping, powdered sugar, and vanilla extract. Use a hand mixer or whisk to beat until soft peaks form—about 2 minutes. You want it light and airy, not stiff. Spread this gently over the marshmallow layer, being careful not to mix the two layers together.
- Layer the graham cracker crunch. Sprinkle the crushed graham crackers evenly over the whipped topping. Press them down very lightly so they stick, but don’t bury them. If you’re using mini chocolate chips, sprinkle those on top now too.
- Add the toasted marshmallows (optional but amazing). If you have large marshmallows, arrange them on top of the graham cracker layer. Use a kitchen torch to toast them until golden and bubbly. If you don’t have a torch, place the pan under the broiler for 30-45 seconds—watch closely so they don’t burn. Let them cool for a minute before moving on.
- Chill, chill, chill. Cover the pan with plastic wrap and refrigerate for at least 6 hours, but overnight is best. This is crucial—the layers need time to set and meld together.
- Serve and enjoy. When you’re ready, run a knife around the edge of the pan, release the springform, and slice. Serve cold, straight from the fridge.
Notes
Don’t skip the salt in the marshmallow layer. Press the crust firmly. Let it chill fully (overnight is best). Toast marshmallows just before serving. Use a wet knife for clean slices. For a quicker chill, freeze for 2 hours instead of refrigerating for 6.
Nutrition
- Serving Size: 1 slice (1/12 of cak
- Calories: 245
- Sugar: 18
- Fat: 11
- Carbohydrates: 34
- Fiber: 2
- Protein: 4
Keywords: no-bake, smores, icebox cake, lightened-up, easy, summer dessert, chocolate, marshmallow, graham cracker