Love this? Save it for later!
Share the inspiration with your friends
I was standing in the checkout line at the craft store last October, minding my own business, when a little girl in front of me dropped her plastic pumpkin bucket. Out rolled a single black cat sticker — the kind with those big, goofy yellow eyes. She didn’t notice. But I couldn’t look away. That sticker hit me like a whiff of something familiar you can’t quite name, and suddenly I was seven years old at my aunt Lena’s kitchen table, pressing the same exact sticker onto a paper plate while she slid a tray of sugar cookies out of the oven. She always made them for Halloween — not the spooky kind, but the cute ones. Black cats with curved tails and icing smiles. She passed away three years ago, and I haven’t seen one of those stickers since. But standing there in line, I realized I didn’t need the sticker. I just needed the cookie.
So I went home, dug out my old cookie cutters, and got to work. Honestly, it took me four tries to get the royal icing right. The first batch looked less like a black cat and more like a charcoal blob with legs. I mean, it was bad. But somewhere around batch three, something clicked — the consistency of the icing, the way the ears held their shape, the little whiskers that actually looked like whiskers. I let out this ridiculous little laugh in my empty kitchen, and I knew I had it. Maybe you’ve been there — chasing a taste or a texture from your past, just hoping your hands remember what your brain can’t quite recall.
These black cat sugar cookies are that memory, baked into something real. They’re not fancy or complicated. They’re just exactly what they’re supposed to be — buttery, crisp, and completely adorable. And every time I pipe those little yellow eyes, I think of Aunt Lena and her sticker collection. That’s why I keep making them, year after year. Not because they’re perfect, but because they bring her back for just a minute.
Why You’ll Love This Recipe
Let me tell you why these little guys are worth every minute in the kitchen. I’ve tested this recipe six times — yes, six — to make sure the cookies hold their shape and the icing behaves itself. You’re not getting a half-baked idea here. This is the version that actually works.
- Quick & Easy: The dough comes together in about 15 minutes, and you only need 30 minutes of chill time. No all-day project here.
- Simple Ingredients: Butter, sugar, flour, eggs — the usual suspects. You probably have everything in your pantry right now, minus the black gel food coloring.
- Perfect for Halloween: These steal the show at parties, classroom treats, or just a cozy night in with a scary movie. They’re cute, not creepy.
- Crowd-Pleaser: Kids love decorating them, and adults love eating them. I’ve yet to see one last more than 24 hours on a plate.
- Unbelievably Delicious: The texture is that perfect balance — crisp on the edges, slightly soft in the middle. And the royal icing sets up with a clean snap, not a sticky mess.
What makes these different from every other sugar cookie recipe out there? It’s the technique. I use a slightly higher ratio of butter to flour, which gives the cookie a richer flavor without spreading too much in the oven. And I add a pinch of almond extract — just a whisper — that makes people say, “Wait, what is that? It’s so good.” Plus, the royal icing recipe here is the one I fought with for weeks until it finally behaved. It dries glossy, not matte, and it doesn’t crack after a day. That’s the stuff.
This is the kind of cookie that makes you close your eyes after the first bite. It’s comfort food reimagined — simple ingredients, honest technique, and a whole lot of heart. Perfect for impressing guests without stress, or turning a regular October evening into something you’ll remember.
What Ingredients You Will Need
This recipe uses simple, wholesome ingredients to deliver that classic buttery sugar cookie flavor with a perfectly crisp edge. Most of these are pantry staples, so you probably don’t need a special trip to the store — except maybe for the black food coloring.
For the Sugar Cookies
- Unsalted butter, softened — 1 cup (226g). I use Kerrygold for the flavor, but any good unsalted butter works. Let it sit out for at least an hour before starting.
- Granulated sugar — 1 cup (200g). Regular white sugar, nothing fancy.
- Large egg — 1, at room temperature. Crack it into a bowl first just in case of shells.
- Vanilla extract — 2 teaspoons. Pure, not imitation, if you can swing it.
- Almond extract — 1/4 teaspoon. This is optional but highly recommended. It adds this subtle, almost floral note that makes people ask what your secret is.
- All-purpose flour — 2 and 1/2 cups (312g). Spoon and level it — don’t scoop straight from the bag or you’ll end up with dry cookies.
- Baking powder — 1 teaspoon.
- Salt — 1/2 teaspoon. Fine sea salt or table salt.
For the Royal Icing
- Powdered sugar — 3 cups (360g), sifted. Sifting is non-negotiable here unless you like lumpy icing.
- Meringue powder — 2 tablespoons. I use Wilton brand because it’s reliable and easy to find at craft stores.
- Warm water — 4 to 5 tablespoons. Start with 4 and add more if needed.
- Black gel food coloring — About 1/2 teaspoon, or more to reach your desired darkness. Americolor Super Black is my go-to — it doesn’t turn the icing bitter like some liquid colors do.
- Yellow gel food coloring — For the eyes. A tiny drop goes a long way.
- White decorating icing — Optional, for adding highlights or whiskers. I use a store-bought tube for convenience.
Ingredient Selection Tip: For the black gel coloring, look for a brand that specifically says “no bitter aftertaste.” Some cheaper dyes can leave a weird metallic flavor. I learned that the hard way with batch two — trust me, it’s worth spending an extra dollar.
Substitution Guidance: If you don’t have meringue powder, you can use 2 large egg whites instead. But be aware that egg white-based icing dries a bit harder and is less forgiving if you live in a humid climate. For a dairy-free version, swap the butter with a high-quality vegan butter stick (not the spreadable kind in a tub). The texture will be slightly different, but still delicious.
Equipment Needed
You don’t need a professional bakery setup for these cookies, but a few specific tools make the process way smoother. Here’s what I use:
- Black cat cookie cutter — Obviously. I got mine on Amazon for about six bucks. Look for one that’s about 3 inches wide so the cookies aren’t too tiny to decorate.
- Stand mixer or hand mixer — A stand mixer is easier for the dough, but a hand mixer works fine. I’ve made these with both.
- Rolling pin with thickness guides — These are a game-changer. I use a wooden pin with removable rings that give me a perfect 1/4-inch thickness every time.
- Parchment paper — For lining your baking sheets. Silpat mats work too, but parchment makes cleanup easier.
- Piping bags or squeeze bottles — For the royal icing. I prefer small squeeze bottles for flooding and piping bags with a #2 tip for details.
- Cooling rack — Essential for letting the royal icing set without sticking to anything.
- Small offset spatula — Helpful for transferring cut cookies to the baking sheet without distorting their shape.
Budget-Friendly Options: If you don’t have piping bags, you can use a zip-top bag with the corner snipped off. It’s not as precise, but it works in a pinch. And if you don’t have a cat-shaped cutter, you can use a round cutter and draw on the ears with icing — honestly, it’s a cute look.
Preparation Method
Alright, let’s get to the good stuff. I’ll walk you through every step so you don’t end up with charcoal blobs like I did the first time.
Step 1: Make the Cookie Dough
In a large mixing bowl, beat the softened butter and granulated sugar together on medium speed until light and fluffy — about 2 to 3 minutes. You want it to look pale and almost creamy. Scrape down the sides of the bowl once during this process.
Add the egg, vanilla extract, and almond extract. Beat on low until just combined. Don’t overmix here — you’re not trying to incorporate air, just blend it together.
In a separate bowl, whisk together the flour, baking powder, and salt. Gradually add this dry mixture to the wet ingredients, mixing on low speed. Stop as soon as the dough comes together. It should look crumbly at first, then form a cohesive ball after a few seconds. If it’s too sticky, add a tablespoon more flour. If it’s too dry, add a teaspoon of milk.
Step 2: Chill the Dough
Divide the dough into two discs, wrap each tightly in plastic wrap, and refrigerate for at least 30 minutes. I usually do an hour. This step is not optional — warm dough spreads in the oven and your cats will look like melted puddles. While you wait, clean up your workspace and get your cookie cutter ready.
Step 3: Roll and Cut
Preheat your oven to 350°F (175°C). Line two baking sheets with parchment paper.
Lightly flour your work surface and rolling pin. Roll one disc of dough to 1/4-inch thickness. If you don’t have thickness guides, use two wooden spoons or rulers on either side as a guide — it’s a trick my neighbor taught me and it works beautifully.
Cut out your cat shapes and transfer them to the prepared baking sheets, spacing them about 2 inches apart. Gather the scraps, re-roll, and cut again. You should get about 18 to 24 cookies depending on the size of your cutter.
Step 4: Bake
Bake for 8 to 10 minutes, rotating the pans halfway through. The edges should be just barely golden — you’re not looking for brown. The centers will look slightly underdone, but they’ll firm up as they cool. Let them sit on the baking sheet for 5 minutes, then transfer to a cooling rack. Cool completely before icing. I mean completely — if there’s any warmth left, the icing will slide right off.
Step 5: Make the Royal Icing
In a clean mixing bowl, combine the sifted powdered sugar and meringue powder. Add 4 tablespoons of warm water and beat on low speed for about 4 minutes. The icing should be thick but flowy — think the consistency of honey. If it’s too thick, add water a teaspoon at a time. If it’s too thin, add more powdered sugar.
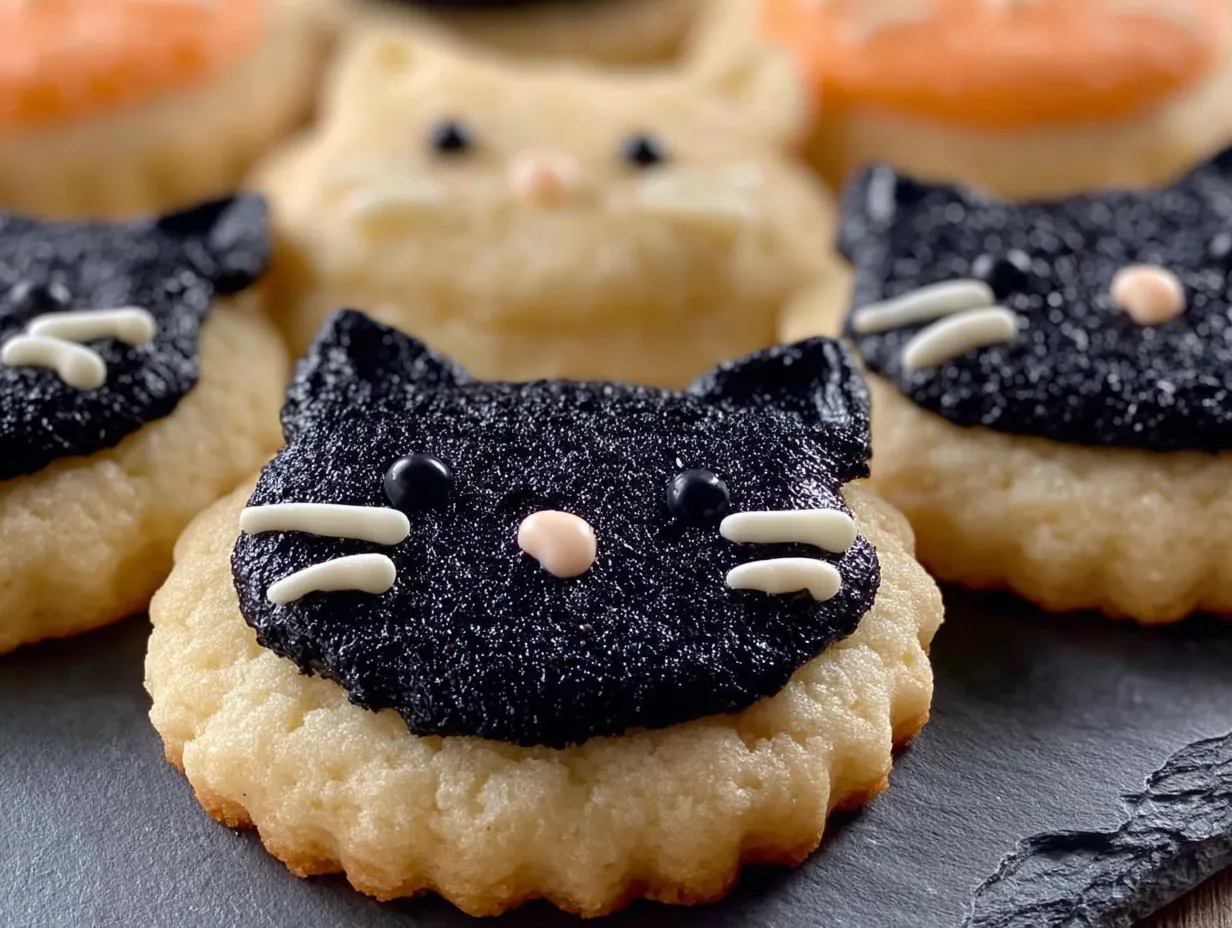
Divide the icing into two bowls. Add black gel coloring to one bowl and mix until you reach your desired darkness. Leave the second bowl white for highlights, or color it yellow for the eyes.
Step 6: Decorate the Cookies
Transfer the black icing to a piping bag or squeeze bottle. Outline each cookie first, then flood the inside with a slightly thinner consistency. Use a toothpick to spread the icing into corners and pop any air bubbles. Let the base layer dry for at least 2 hours — overnight is better.
Once the black base is dry, pipe on yellow eyes and a little pink or white nose. Add whiskers using the white decorating icing or a thin stream of white royal icing. Let everything dry completely before stacking or storing — about 4 to 6 hours total.
Cooking Tips & Techniques
I’ve made plenty of mistakes with these cookies so you don’t have to. Here are the things I wish someone had told me:
The Dough Temperature is Everything. If your dough feels sticky when you’re rolling it out, don’t add more flour — just pop it back in the fridge for 10 minutes. Cold dough rolls like a dream and holds its shape in the oven. Warm dough is a nightmare. I learned this the hard way when my first batch of cats came out looking like abstract art.
Don’t Overbake. Sugar cookies go from perfect to overdone in about 30 seconds. Pull them out when the edges are just barely set and the centers still look slightly soft. They’ll continue baking on the hot pan. If you wait until they look fully done, they’ll be crunchy all the way through — which isn’t bad, but it’s not the texture we’re going for.
The Icing Consistency Test. Here’s a trick I picked up from a cookie decorating class: lift your spatula out of the icing and let it drip back into the bowl. If the ribbon of icing sits on top for 5 seconds before sinking back in, it’s perfect. If it sinks immediately, it’s too thin. If it doesn’t sink at all, it’s too thick.
Work in Batches. Don’t try to decorate all 24 cookies at once. The icing will start to crust over in your piping bag, and you’ll get frustrated. Decorate 6 at a time, then take a break. Your hands will thank you, and your cookies will look better.
Patience is a Virtue. I know you want to eat them immediately. I get it. But if you stack or package these cookies before the icing is fully dry, you’ll smudge all your hard work. Give them a full 6 hours on the counter. Go watch a movie. Take a nap. They’ll be there when you wake up.
Variations & Adaptations
One of the best things about this recipe is how flexible it is. Here are some ways to make it your own:
Gluten-Free Version: Swap the all-purpose flour with a 1:1 gluten-free baking flour blend. I’ve used Bob’s Red Mill and King Arthur with good results. The texture will be slightly more crumbly, so handle the dough gently. Add an extra tablespoon of butter to compensate for the dryness of gluten-free flours.
Vegan Adaptation: Use vegan butter sticks and replace the egg with a flax egg (1 tablespoon ground flaxseed mixed with 3 tablespoons water, let sit for 5 minutes). For the royal icing, use aquafaba (the liquid from a can of chickpeas) instead of meringue powder. Whip it until frothy before adding the powdered sugar. It works — I tested it for a friend’s Halloween party last year.
Flavor Twists: Add 1 tablespoon of cocoa powder to the dough for a chocolate version — it makes the cats look even darker and adds a rich undertone. Or try adding orange zest and a pinch of cinnamon for a pumpkin spice vibe. I did that last fall and it was a huge hit.
Different Shapes: Don’t limit yourself to cats. This dough works beautifully with any shape — pumpkins, ghosts, bats, or even simple circles. The royal icing recipe is the same; just change the colors. I’ve made these as ghosts with white icing and black dot eyes, and they’re just as adorable.
No-Icing Option: If you don’t want to mess with royal icing, sprinkle the cookies with black sanding sugar before baking. They won’t have faces, but they’ll sparkle like little gems. Sometimes simple is better.
Serving & Storage Suggestions
These cookies are best at room temperature — the texture is just right, and the icing has that perfect snap. Serve them on a platter with other Halloween treats like spider web cupcakes or pumpkin spice bars for a themed dessert table that’ll impress everyone.
For storage, place the fully dried cookies in an airtight container with parchment paper between the layers. They’ll stay fresh for up to 5 days at room temperature. Do not refrigerate them — the humidity in the fridge can make the icing tacky and cause the cookies to soften.
If you want to freeze them, do it before icing. Wrap the baked, un-iced cookies tightly in plastic wrap and then foil. They’ll keep for up to 3 months. When you’re ready to decorate, thaw them at room temperature and proceed with the icing. I do this every year — I bake a big batch in September and decorate them throughout October as needed.
For reheating, don’t. These are meant to be eaten at room temperature. If you want a warm cookie experience, make a fresh batch. Trust me, it’s worth the effort.
Nutritional Information & Benefits
Let’s be honest — these are cookies. They’re a treat, not a health food. But here’s the breakdown per cookie (based on 24 cookies):
| Nutrient | Amount Per Cookie |
|---|---|
| Calories | 145 |
| Total Fat | 7g |
| Saturated Fat | 4g |
| Cholesterol | 25mg |
| Sodium | 55mg |
| Total Carbohydrates | 20g |
| Sugars | 13g |
| Protein | 2g |
On the upside, these cookies do contain protein from the eggs and butter, and they’re free of artificial preservatives. If you use almond extract, you get a tiny bit of vitamin E. But really, these are about joy, not nutrition. Make them for the smiles, not the macros.
Dietary Considerations: Contains dairy, eggs, and gluten. For nut-free, skip the almond extract. For low-sugar, use a sugar substitute in the dough (though I can’t vouch for the texture). The royal icing is not low-sugar — it’s basically powdered sugar and nothing else. But hey, it’s Halloween.
FAQs
Can I make the dough ahead of time?
Absolutely. The dough can be refrigerated for up to 3 days or frozen for up to 3 months. Just wrap it tightly in plastic wrap and then foil. Thaw it in the fridge overnight before rolling and cutting.
Why did my cookies spread in the oven?
Usually it’s because the dough wasn’t chilled enough. Pop the cut cookies back in the fridge for 15 minutes before baking. Also, make sure your butter wasn’t too soft — it should be softened but still hold its shape when pressed.
How do I get the royal icing to dry faster?
You can use a fan or a dehydrator on the lowest setting. But honestly, patience is the best tool. If you rush it, the icing will crack or become tacky. Give it the full 6 hours.
Can I use liquid food coloring instead of gel?
You can, but you’ll need a lot more to achieve a deep black, and that much liquid will thin out your icing. Gel is really the way to go here. It’s more concentrated and won’t mess with your consistency.
My cookies taste bland. What went wrong?
Probably not enough salt or vanilla. Salt is crucial in sugar cookies — it balances the sweetness and brings out the buttery flavor. Make sure you’re using the full 1/2 teaspoon. And don’t skip the almond extract — it makes a bigger difference than you’d think.
Conclusion
These black cat sugar cookies are more than just a Halloween treat — they’re a little piece of memory I get to share with you. They’re buttery, adorable, and surprisingly forgiving once you get the hang of the icing. Whether you’re making them for a party, a classroom, or just because you miss someone, they deliver every single time.
I’d love to see how yours turn out. Tag me in your photos, leave a comment below, or tell me about the memory these cookies bring back for you. Maybe you had an aunt with a sticker collection too. Or maybe this is the start of a new tradition — one you’ll pass down someday. That’s the beautiful thing about recipes. They’re not just instructions. They’re stories we get to keep making.
So go ahead — preheat that oven, roll out that dough, and make some magic. Your kitchen is about to smell incredible.
Pin This Recipe!

Easy Black Cat Sugar Cookies with Royal Icing

Buttery, crisp sugar cookies shaped like adorable black cats, topped with glossy royal icing and cute yellow eyes. A nostalgic Halloween treat that’s perfect for parties, classroom treats, or a cozy night in.
- Prep Time: 15 minutes
- Cook Time: 10 minutes
- Total Time: 45 minutes (plus 30 minutes chill time and 4-6 hours drying time)
- Yield: 24 servings 1x
- Category: Dessert
- Cuisine: American
Ingredients
- 1 cup (226g) unsalted butter, softened
- 1 cup (200g) granulated sugar
- 1 large egg, at room temperature
- 2 teaspoons pure vanilla extract
- 1/4 teaspoon almond extract (optional but recommended)
- 2 and 1/2 cups (312g) all-purpose flour, spooned and leveled
- 1 teaspoon baking powder
- 1/2 teaspoon fine sea salt or table salt
- 3 cups (360g) powdered sugar, sifted
- 2 tablespoons meringue powder (e.g., Wilton)
- 4 to 5 tablespoons warm water
- 1/2 teaspoon black gel food coloring (e.g., Americolor Super Black), or more as needed
- Yellow gel food coloring (for eyes)
- White decorating icing (optional, for highlights or whiskers)
Instructions
- Make the cookie dough: In a large mixing bowl, beat the softened butter and granulated sugar together on medium speed until light and fluffy, about 2 to 3 minutes. Scrape down the sides once.
- Add the egg, vanilla extract, and almond extract. Beat on low until just combined.
- In a separate bowl, whisk together the flour, baking powder, and salt. Gradually add to the wet ingredients, mixing on low speed until the dough comes together. If too sticky, add 1 tablespoon more flour; if too dry, add 1 teaspoon milk.
- Divide the dough into two discs, wrap each tightly in plastic wrap, and refrigerate for at least 30 minutes (1 hour is better).
- Preheat oven to 350°F (175°C). Line two baking sheets with parchment paper.
- Lightly flour your work surface and rolling pin. Roll one disc of dough to 1/4-inch thickness. Cut out cat shapes and transfer to prepared baking sheets, spacing 2 inches apart. Gather scraps, re-roll, and cut again. You should get 18 to 24 cookies.
- Bake for 8 to 10 minutes, rotating pans halfway through. Edges should be just barely golden; centers will look slightly underdone. Let cool on baking sheet for 5 minutes, then transfer to a cooling rack. Cool completely before icing.
- Make the royal icing: In a clean mixing bowl, combine sifted powdered sugar and meringue powder. Add 4 tablespoons warm water and beat on low speed for about 4 minutes until thick but flowy (consistency of honey). Add more water or powdered sugar as needed.
- Divide icing into two bowls. Add black gel coloring to one bowl and mix until desired darkness. Leave the second bowl white or color it yellow for eyes.
- Decorate the cookies: Transfer black icing to a piping bag or squeeze bottle. Outline each cookie, then flood the inside with slightly thinner icing. Use a toothpick to spread into corners and pop air bubbles. Let base layer dry for at least 2 hours (overnight is better).
- Once black base is dry, pipe on yellow eyes and a small pink or white nose. Add whiskers using white decorating icing or a thin stream of white royal icing. Let dry completely before stacking or storing, about 4 to 6 hours total.
Notes
Chill the dough thoroughly to prevent spreading. Do not overbake; edges should be just set. For the icing, use gel food coloring to avoid thinning. Let icing dry completely before stacking. Cookies can be frozen un-iced for up to 3 months.
Nutrition
- Serving Size: 1 cookie
- Calories: 145
- Sugar: 13
- Sodium: 55
- Fat: 7
- Saturated Fat: 4
- Carbohydrates: 20
- Protein: 2
Keywords: black cat cookies, sugar cookies, Halloween cookies, royal icing cookies, cut-out cookies, easy sugar cookies, decorated cookies