Love this? Save it for later!
Share the inspiration with your friends
This was supposed to be a simple batch of chocolate chip cookies. I had the butter softening on the counter, the vanilla was measured, and I was ready for a classic, no-fuss baking afternoon. But then I saw the box of peppermint bark sitting on the counter—leftover from a holiday party that happened three weeks ago. It was staring at me. You know that feeling when an ingredient just demands to be used? I figured, why not chop it up and toss it in? Honestly, I was half-convinced I was about to ruin a perfectly good cookie dough. I mean, peppermint and chocolate chip cookies? It felt like a gamble I was going to lose.
The first batch came out of the oven, and I nearly laughed. They were ugly. The peppermint bark had melted into these strange, oily puddles on the baking sheet, and the cookies looked more like abstract art than dessert. I grabbed one while it was still warm—burned my fingers, obviously—and took a bite. And then I just stood there in my kitchen, staring at the counter. The crunch of the candy cane pieces, the pockets of melted dark chocolate, the soft, buttery cookie base… it was better than anything I had planned. I grabbed another one, this time with a glass of cold milk, and I knew I had stumbled onto something I’d be making for years.
What I love about this recipe is that it started as a mistake. It’s not a fancy, complicated cookie. It’s the kind of thing you make when you’re just playing around in the kitchen, not taking yourself too seriously. Maybe you’ve been there—staring at a random ingredient, wondering if it will work. Spoiler: it does. And now, every time I make these Perfect Peppermint Bark Chocolate Chip Cookies, I remember that afternoon of happy accidents. They remind me that sometimes the best recipes come from letting go of the plan.
Why You’ll Love This Recipe
These aren’t just another chocolate chip cookie. They are a full-on holiday moment packed into a single bite. Here is why you will keep coming back to this recipe:
- Quick & Easy: From start to finish, these cookies come together in about 30 minutes. No chilling required, no complicated techniques. Just mix, scoop, and bake.
- Simple Ingredients: You likely already have the base ingredients in your pantry. The only special addition is the peppermint bark, which is easy to find during the winter months.
- Perfect for the Holidays: These cookies are a showstopper for cookie swaps, holiday parties, or cozy nights by the fire. They bring that festive peppermint vibe without being overwhelming.
- Crowd-Pleaser: I have brought these to three different gatherings this season, and every single time, someone asks for the recipe. Kids love the candy crunch, and adults appreciate the balanced sweetness.
- Unbelievably Delicious: The texture is next-level. You get a soft, chewy center, crispy edges, and little pockets of melted chocolate and crunchy peppermint. It is the kind of cookie that makes you close your eyes after the first bite.
What makes this recipe different from the rest is the way the peppermint bark integrates into the dough. Instead of just sprinkling crushed candy canes on top, the bark melts into the cookie as it bakes, creating these beautiful, crackled layers of chocolate and mint. It is not just a garnish—it is part of the cookie’s soul. I tested this recipe four times to get the balance right. Too much bark, and the cookies spread too thin. Too little, and you miss the magic. This version is my best version.
This recipe is comfort food reimagined. It takes the classic cookie you grew up loving and gives it a festive, grown-up twist. It is perfect for impressing guests without stress, or turning a simple Tuesday evening into something memorable.
What Ingredients You Will Need
This recipe uses simple, wholesome ingredients to deliver bold flavor and satisfying texture without the fuss. Most of these are pantry staples, with the peppermint bark being the seasonal star. Let me walk you through each one.
For the Cookie Dough
- Unsalted butter, softened (1 cup / 2 sticks) – I always use unsalted so I can control the salt level. Let it soften at room temperature for about 30 minutes. Do not melt it—you want that creamy, spreadable texture.
- Granulated sugar (3/4 cup / 150g) – Adds sweetness and helps create those crispy edges we all love.
- Light brown sugar, packed (3/4 cup / 150g) – This is the secret to a chewy cookie. The molasses in brown sugar keeps the centers soft and tender. I recommend Domino or C&H for consistent results.
- Large eggs (2, room temperature) – Room temperature eggs incorporate better into the creamed butter, creating a smoother dough. Take them out of the fridge when you take out the butter.
- Pure vanilla extract (2 teaspoons) – Use the real stuff here, not imitation. It makes a difference. I like Nielsen-Massey for its rich flavor.
- All-purpose flour (2 1/4 cups / 280g) – Spoon and level your flour. Scooping directly from the bag packs it down and gives you too much flour, leading to dry cookies.
- Baking soda (1 teaspoon) – Helps the cookies spread and rise just enough.
- Salt (1/2 teaspoon) – Balances the sweetness and enhances the chocolate flavor. I use fine sea salt.
For the Peppermint Bark Mix-In
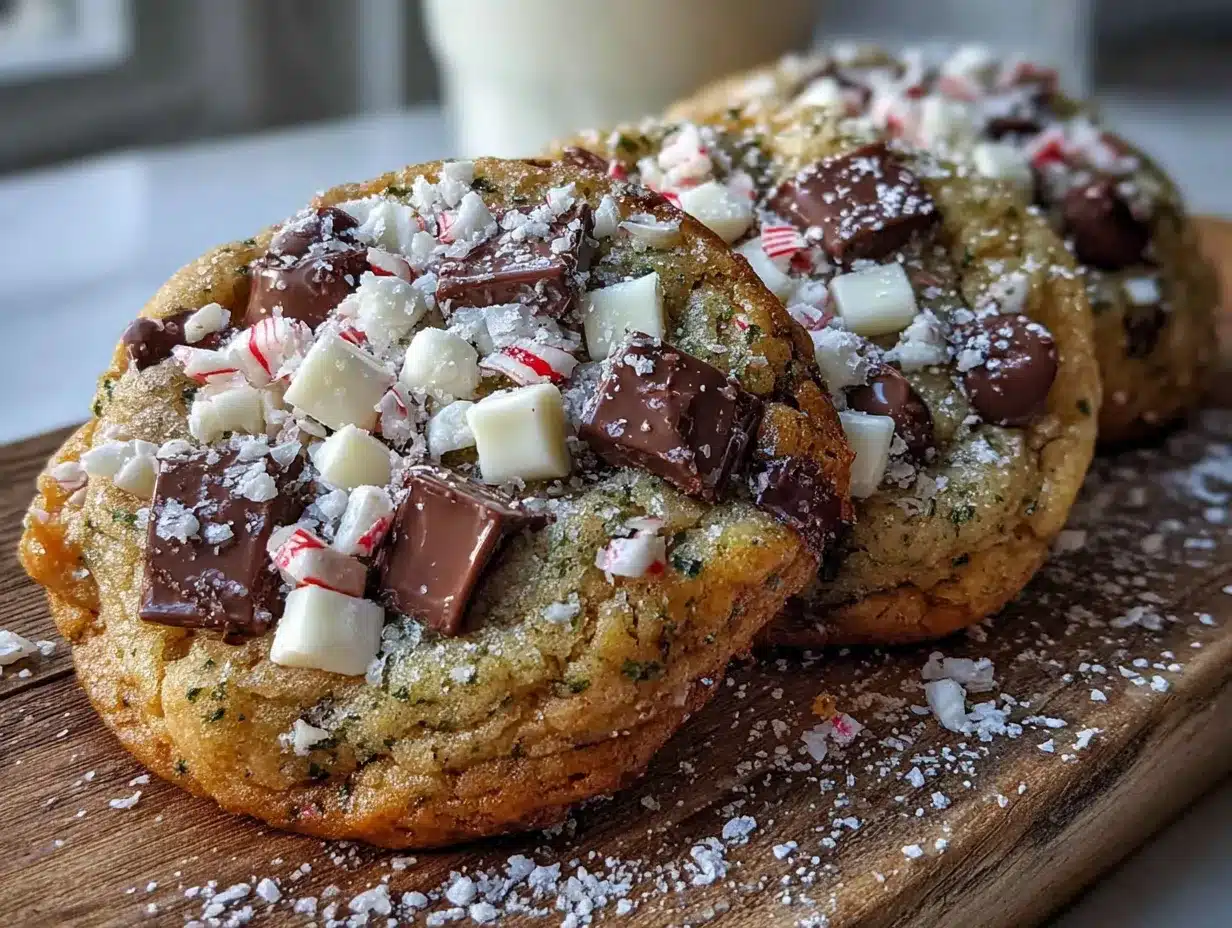
- Peppermint bark (8 ounces / 225g) – This is the star. Look for a good-quality peppermint bark that has layers of dark chocolate, white chocolate, and crushed candy cane pieces. I prefer the one from Williams Sonoma or Ghirardelli. Chop it into roughly 1/2-inch chunks. Do not chop it too fine, or it will melt away completely.
- Semi-sweet chocolate chips (1 cup / 175g) – Adds extra chocolate pockets. I use Guittard or Ghirardelli. The semi-sweet balances the sweetness of the white chocolate in the bark.
Optional Additions
- Flaky sea salt (for sprinkling) – A pinch on top of each cookie right after baking takes them from great to unforgettable. It cuts through the sweetness and adds a professional touch.
- Extra crushed candy canes (for garnish) – If you want that vibrant red and white look on top, press a few crushed pieces onto the dough balls before baking.
Equipment Needed
You don’t need a fancy kitchen to make these cookies. Here is what you will need:
- Electric mixer (stand or hand-held) – A stand mixer with the paddle attachment is my go-to, but a hand mixer works perfectly fine. I have made these with both, and the results are identical.
- Large mixing bowls (at least 2) – One for the wet ingredients, one for the dry.
- Baking sheets (2, preferably light-colored) – Dark baking sheets can cause the bottoms to brown too quickly. If you only have dark sheets, reduce the oven temperature by 25°F.
- Parchment paper or silicone baking mats – Essential for easy cleanup and preventing sticking. I prefer parchment paper because it helps the cookies spread evenly.
- Cookie scoop (2-tablespoon size) – This ensures uniform cookies that bake evenly. A 1.5-inch scoop is perfect.
- Cooling rack – Lets air circulate around the cookies so they cool without getting soggy bottoms.
- Chef’s knife and cutting board – For chopping the peppermint bark into chunks.
- Measuring cups and spoons – For accuracy. I cannot stress this enough—baking is a science.
If you do not have a cookie scoop, you can use two spoons to drop the dough. The cookies will be slightly less uniform, but they will taste just as good. Budget-friendly tip: skip the silicone mats and use parchment paper. It is cheaper and works beautifully.
Preparation Method
Let’s get baking. Follow these steps carefully, and you will have a batch of Perfect Peppermint Bark Chocolate Chip Cookies that look and taste like they came from a bakery.
- Preheat your oven to 350°F (175°C). Line two baking sheets with parchment paper. This is the perfect time to take your eggs out of the fridge if you haven’t already.
- Chop the peppermint bark. Using a sharp chef’s knife, cut the bark into roughly 1/2-inch chunks. Some pieces will crumble—that is fine. The small bits will melt into the dough, and the larger chunks will stay intact. Set aside.
- Cream the butter and sugars. In a large mixing bowl, beat the softened butter, granulated sugar, and brown sugar together on medium speed until light and fluffy. This takes about 2-3 minutes. You want the mixture to look pale and airy. Scrape down the sides of the bowl halfway through. I once forgot to scrape, and I ended up with streaks of butter in my dough—not the end of the world, but not ideal.
- Add the eggs and vanilla. Beat in the eggs one at a time, mixing well after each addition. Add the vanilla extract and mix until combined. The mixture should look smooth and glossy.
- Mix the dry ingredients. In a separate bowl, whisk together the flour, baking soda, and salt. This ensures the baking soda is evenly distributed. No one wants a bite of pure baking soda.
- Combine wet and dry. Gradually add the dry ingredients to the wet mixture, mixing on low speed. Stop as soon as the flour disappears. Overmixing develops gluten, which makes cookies tough. I speak from experience—I have a batch of hockey pucks in my past.
- Fold in the mix-ins. Using a rubber spatula, gently fold in the chopped peppermint bark and semi-sweet chocolate chips. Fold just until they are evenly distributed. The dough will be thick and chunky.
- Scoop the dough. Using your cookie scoop, portion out rounded tablespoons of dough (about 2 tablespoons each). Place them on the prepared baking sheets, spacing them 2 inches apart. Do not flatten them—they will spread naturally.
- Optional: Garnish. If you want extra crunch and color, press a few crushed candy cane pieces onto the top of each dough ball. This makes them look extra festive.
- Bake. Bake one sheet at a time for 10-12 minutes. The cookies should look set around the edges but still soft and slightly underdone in the center. They will continue to bake on the hot baking sheet after you take them out. For a chewier cookie, pull them at 10 minutes. For a crispier edge, go to 12 minutes.
- Cool. Let the cookies cool on the baking sheet for 5 minutes. This is crucial—they are fragile when hot. After 5 minutes, transfer them to a wire cooling rack to cool completely. If you are sprinkling flaky sea salt, do it right after you pull them from the oven.
One more thing: do not overcrowd the baking sheet. I learned this the hard way when I tried to fit 12 cookies on one sheet. They spread into each other, and I ended up with one giant cookie pancake. Delicious, but not pretty.
Cooking Tips & Techniques
Over the years, I have made a lot of cookies. Some were triumphs. Some were, well, learning experiences. Here are the tips I wish someone had told me earlier.
Chill the dough if you have time. While this recipe does not require chilling, letting the dough rest in the fridge for 30 minutes will concentrate the flavors and prevent excessive spreading. The cookies will be thicker and chewier. I have done it both ways, and honestly, the chilled version is slightly better. But if you are in a rush, skip it—the cookies are still fantastic.
Watch your oven temperature. Ovens run hot or cold. I have an older oven that runs 25°F hotter than the dial says. I learned this after burning two batches of cookies in a row. Invest in an oven thermometer. It costs $10 and saves you from heartbreak.
Do not overmix the dough. I cannot say this enough. Once the flour goes in, mix only until you see no more white streaks. Overmixing develops gluten, and gluten makes cookies tough. You want tender, not tough.
Use a cookie scoop for uniform size. Uniform cookies bake evenly. If you have a mix of small and large dough balls, the small ones will burn before the large ones are done. A scoop is a small investment that pays off every time.
Test bake one cookie first. This is a trick I picked up from a pastry chef friend. Scoop one cookie and bake it. See how it spreads and bakes. If it spreads too much, add a tablespoon of flour to the dough. If it does not spread enough, add a tablespoon of milk. This saves you from ruining an entire batch.
Store with a slice of bread. If you want your cookies to stay soft for days, store them in an airtight container with a slice of white bread. The bread absorbs excess moisture and releases it to the cookies. It sounds weird, but it works. Just replace the bread every couple of days.
One more thing: I once forgot the baking soda. I was in a rush, distracted by a phone call, and I just… skipped it. The cookies came out flat and dense. They tasted okay, but the texture was all wrong. So, double-check your ingredients. It is the small things that make the difference.
Variations & Adaptations
This recipe is a fantastic base for experimentation. Here are some variations I have tried and loved.
Gluten-Free Version: Substitute the all-purpose flour with a 1:1 gluten-free baking flour blend. I like the one from King Arthur Flour. The cookies will be slightly more crumbly, but the flavor is still there. Add an extra tablespoon of milk to the dough to help with moisture.
Double Chocolate Peppermint: Replace 1/4 cup of the all-purpose flour with unsweetened cocoa powder. This creates a dark chocolate cookie base that pairs beautifully with the peppermint bark. Reduce the baking time by 1 minute, as cocoa cookies tend to dry out faster.
White Chocolate & Peppermint: If you are not a fan of dark chocolate, swap the semi-sweet chocolate chips for white chocolate chips. The cookie becomes sweeter and creamier, with a more subtle peppermint flavor. I made these for a friend who hates dark chocolate, and she ate six in one sitting.
Vegan Adaptation: Use vegan butter (I recommend Earth Balance), replace the eggs with flax eggs (1 tablespoon ground flaxseed + 3 tablespoons water per egg), and use dairy-free chocolate chips. The cookies will be a bit flatter, but the flavor is surprisingly close to the original.
Peppermint Crunch without Bark: If you cannot find peppermint bark, use 1/2 cup crushed candy canes and 1 cup dark chocolate chips. The texture will be crunchier, and the peppermint flavor will be more intense. I actually prefer this version for a more pronounced mint kick.
Spiced Peppermint: Add 1/2 teaspoon of cinnamon and a pinch of nutmeg to the dry ingredients. The warm spices complement the peppermint in a way that feels cozy and unexpected. This is my go-to version for Christmas morning.
I once tried adding dried cranberries to the dough, thinking the tartness would balance the sweetness. It did not. The cranberries became tough and chewy, and they clashed with the peppermint. So, stick with the variations above—they are tested and approved.
Serving & Storage Suggestions
These cookies are best served slightly warm, when the chocolate is still melty and the peppermint bark is soft. If you are serving them at a party, pop them in a 300°F oven for 3-4 minutes to reheat them. It brings back that fresh-from-the-oven magic.
For presentation, arrange the cookies on a festive platter or a wooden board. Sprinkle a few crushed candy canes around the plate for color. They pair beautifully with a glass of cold milk, a hot cup of coffee, or a peppermint mocha. If you are feeling fancy, serve them alongside a scoop of vanilla ice cream for a cookie sundae.
Storage: Store the cookies in an airtight container at room temperature for up to 5 days. They will stay soft and chewy. If you live in a humid environment, add a silica gel packet (the kind you find in shoe boxes) to the container to absorb excess moisture. I learned this trick from a baker in Florida, and it is a game-changer.
Freezing: These cookies freeze beautifully. You can freeze the baked cookies for up to 3 months. Wrap them individually in plastic wrap, then place them in a freezer-safe bag. To thaw, leave them at room temperature for 30 minutes. Alternatively, freeze the raw dough balls on a baking sheet, then transfer them to a freezer bag. Bake from frozen, adding 2-3 minutes to the baking time. This is my favorite method for having fresh cookies on demand.
One thing I noticed: the peppermint flavor mellows slightly after a day or two. So, if you want that intense minty kick, eat them within 24 hours. Not that they will last that long, honestly.
Nutritional Information & Benefits
Here is the estimated nutritional breakdown per cookie (based on a batch of 24 cookies):
| Nutrient | Amount per Cookie |
|---|---|
| Calories | 210 |
| Total Fat | 11g |
| Saturated Fat | 6g |
| Cholesterol | 35mg |
| Sodium | 120mg |
| Total Carbohydrates | 27g |
| Dietary Fiber | 1g |
| Sugars | 18g |
| Protein | 3g |
These cookies are a treat, not a health food. But there are a few bright spots. The dark chocolate in the peppermint bark and chips contains antioxidants called flavonoids, which are good for heart health. The peppermint itself can aid digestion and provide a refreshing, calming effect. And let’s be honest—sometimes, a little indulgence is good for the soul.
For dietary considerations: This recipe contains gluten, dairy, and eggs. It is not suitable for vegans or those with celiac disease without the substitutions mentioned above. If you are watching your sugar intake, you can reduce the granulated sugar by 2 tablespoons, but the texture will be slightly less tender.
From a wellness perspective, I believe in balance. These cookies are for celebrations, for cozy nights, for moments when you need a little joy. They are not an everyday snack, but they are worth every single bite.
Conclusion
These Perfect Peppermint Bark Chocolate Chip Cookies are more than just a recipe—they are a little piece of holiday magic that you can create in your own kitchen. They started as a mistake, a happy accident that turned into something I genuinely look forward to making every year. The combination of buttery cookie, rich chocolate, and crunchy peppermint is just… right.
I encourage you to make these your own. Add a pinch of cinnamon, swap the chocolate chips, or double the peppermint bark. Play around with it. That is the beauty of baking—it is personal, and it should bring you joy. If you try these cookies, I would love to hear about it. Leave a comment below and let me know how they turned out. Did you add a twist? Did your family love them? Share your story.
Thank you for stopping by and spending a little time in my kitchen. Now go preheat that oven. You deserve a warm cookie.
Frequently Asked Questions
Can I use peppermint extract instead of peppermint bark?
You can, but it will change the texture. Add 1/2 teaspoon of peppermint extract to the dough along with the vanilla. You will still need some crushed candy canes or chocolate mint pieces for that signature crunch.
Why did my cookies spread too much?
This usually happens if the butter was too soft or melted, or if the dough was not chilled. Next time, make sure your butter is softened but still cool to the touch. If your kitchen is warm, chill the dough for 15 minutes before baking.
Can I make these cookies ahead of time?
Absolutely. You can prepare the dough up to 3 days in advance and keep it in the fridge. Let it sit at room temperature for 10 minutes before scooping and baking. You can also freeze the baked cookies for up to 3 months.
What is the best way to crush candy canes for garnish?
Place the candy canes in a zip-top bag and crush them with a rolling pin or the bottom of a heavy pan. Do not overdo it—you want small pieces, not powder. Some fine dust is okay, but chunks add better texture.
Can I use milk chocolate instead of semi-sweet?
Yes, but the cookies will be noticeably sweeter. If you use milk chocolate, consider reducing the granulated sugar by 2 tablespoons to balance the sweetness. I personally prefer semi-sweet because it contrasts nicely with the sweet peppermint bark.
Pin This Recipe!

Perfect Peppermint Bark Chocolate Chip Cookies

These cookies combine a classic chocolate chip cookie base with chunks of peppermint bark, creating a festive treat with soft, chewy centers, crispy edges, and pockets of melted chocolate and crunchy peppermint.
- Prep Time: 15 minutes
- Cook Time: 12 minutes
- Total Time: 27 minutes
- Yield: 24 servings 1x
- Category: Dessert
- Cuisine: American
Ingredients
- 1 cup (2 sticks) unsalted butter, softened
- 3/4 cup (150g) granulated sugar
- 3/4 cup (150g) light brown sugar, packed
- 2 large eggs, room temperature
- 2 teaspoons pure vanilla extract
- 2 1/4 cups (280g) all-purpose flour
- 1 teaspoon baking soda
- 1/2 teaspoon salt
- 8 ounces (225g) peppermint bark, chopped into 1/2-inch chunks
- 1 cup (175g) semi-sweet chocolate chips
- Flaky sea salt (optional, for sprinkling)
- Extra crushed candy canes (optional, for garnish)
Instructions
- Preheat your oven to 350°F (175°C). Line two baking sheets with parchment paper.
- Chop the peppermint bark into roughly 1/2-inch chunks. Set aside.
- In a large mixing bowl, beat the softened butter, granulated sugar, and brown sugar together on medium speed until light and fluffy, about 2-3 minutes. Scrape down the sides of the bowl halfway through.
- Beat in the eggs one at a time, mixing well after each addition. Add the vanilla extract and mix until combined.
- In a separate bowl, whisk together the flour, baking soda, and salt.
- Gradually add the dry ingredients to the wet mixture, mixing on low speed until just combined. Do not overmix.
- Using a rubber spatula, gently fold in the chopped peppermint bark and semi-sweet chocolate chips until evenly distributed.
- Using a cookie scoop (2-tablespoon size), portion out rounded tablespoons of dough and place them on the prepared baking sheets, spacing them 2 inches apart. Do not flatten.
- Optional: Press a few crushed candy cane pieces onto the top of each dough ball for garnish.
- Bake one sheet at a time for 10-12 minutes, until edges are set but centers are still soft. For chewier cookies, bake 10 minutes; for crispier edges, bake 12 minutes.
- Let cookies cool on the baking sheet for 5 minutes, then transfer to a wire cooling rack to cool completely. If using flaky sea salt, sprinkle on top immediately after removing from oven.
Notes
For thicker, chewier cookies, chill the dough for 30 minutes before baking. If cookies spread too much, add 1 tablespoon of flour to the dough. Store in an airtight container at room temperature for up to 5 days. To keep cookies soft, add a slice of white bread to the container. Freeze baked cookies for up to 3 months, or freeze raw dough balls and bake from frozen, adding 2-3 minutes to the baking time.
Nutrition
- Serving Size: 1 cookie
- Calories: 210
- Sugar: 18
- Sodium: 120
- Fat: 11
- Saturated Fat: 6
- Carbohydrates: 27
- Fiber: 1
- Protein: 3
Keywords: peppermint bark, chocolate chip cookies, holiday cookies, peppermint cookies, easy cookie recipe