Love this? Save it for later!
Share the inspiration with your friends
Maya wasn’t trying to impress anyone. I’d stopped by her place on a random Wednesday afternoon to drop off a book I’d borrowed, and the smell hit me before I even got through the door. Something warm and buttery and sweet, with a hint of something familiar I couldn’t quite place. She was in the kitchen, three kids running circles around her legs, a baby on her hip, and she was casually pressing orange-colored marshmallow mixture into little pumpkin-shaped molds like it was nothing. Like she did this every day. Which, honestly, she probably does.
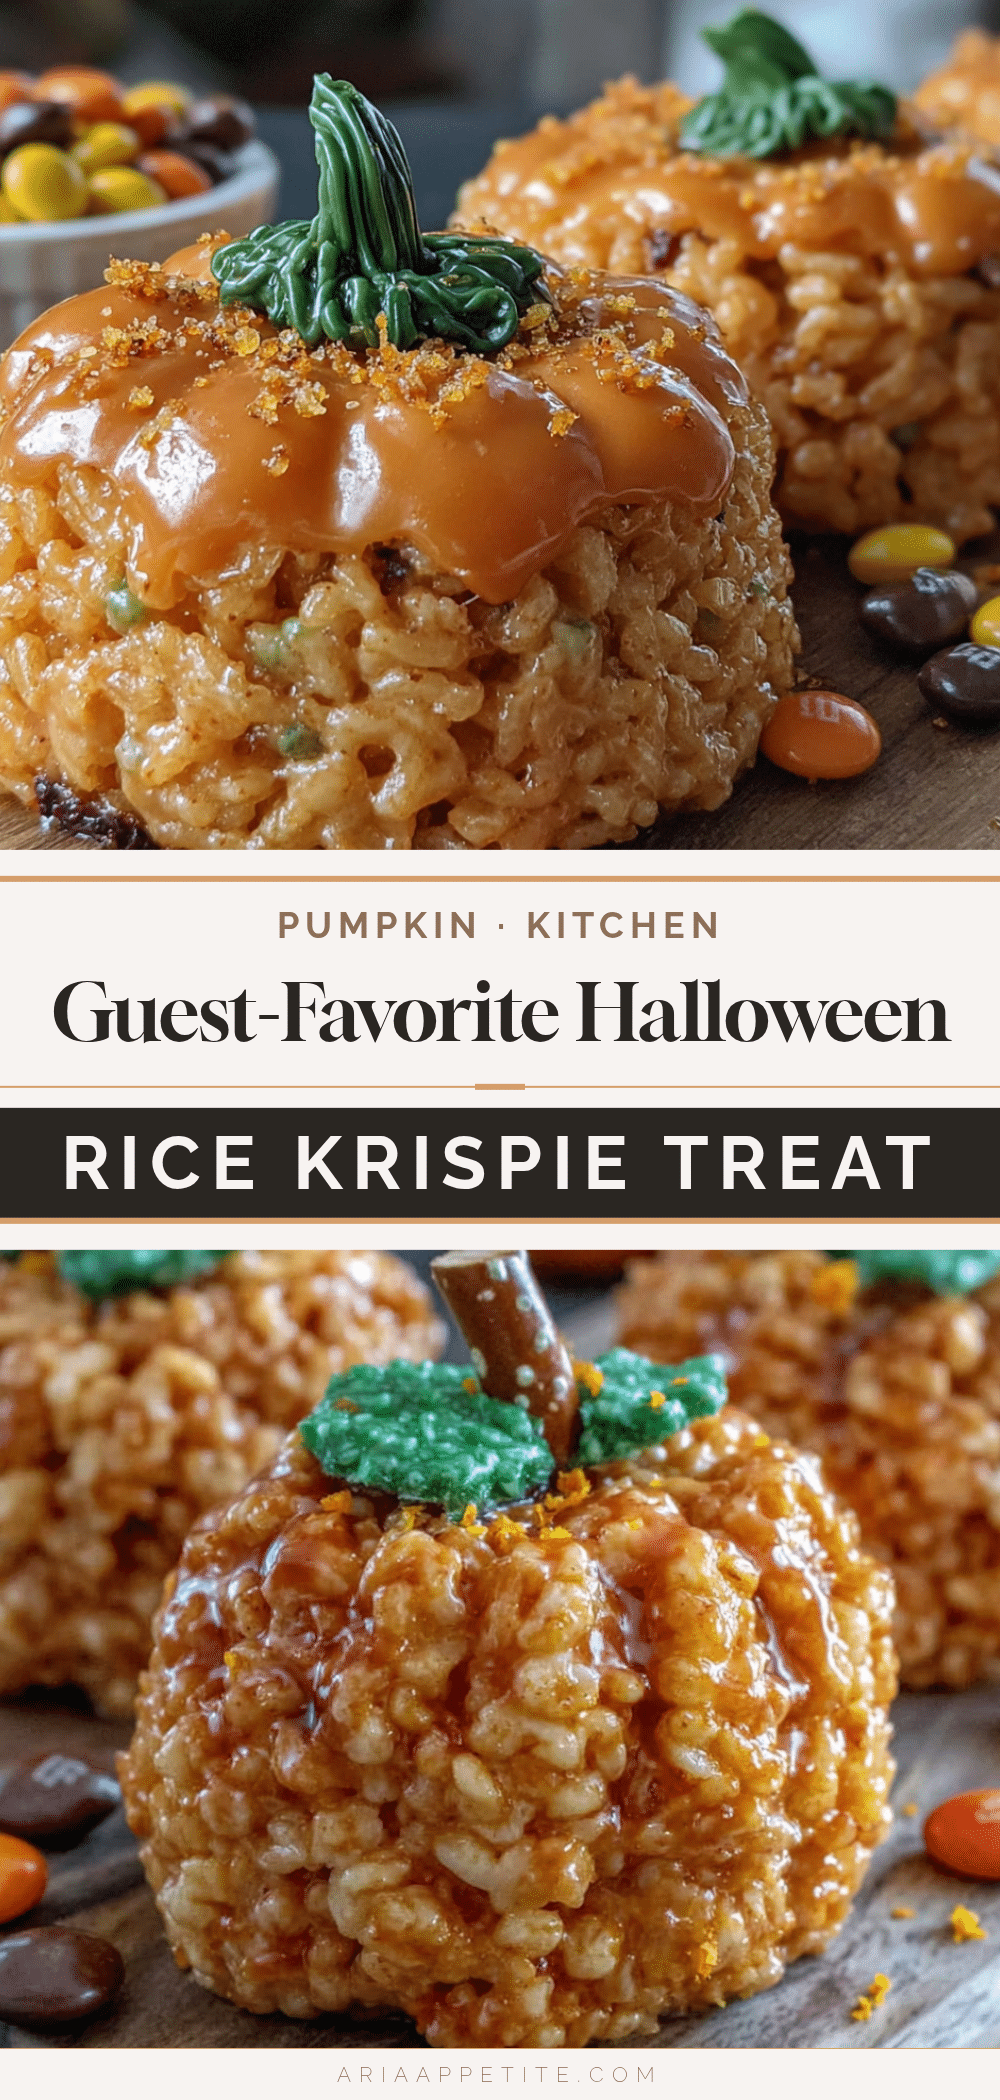
“Oh, those are just for the school Halloween party,” she said when I asked, shrugging like I’d caught her folding laundry. “They’re nothing fancy.” But they were fancy. They were adorable. And I couldn’t stop staring at them. That moment stuck with me. Not because the treats were complicated or chef-level impressive, but because Maya made something so ridiculously fun and festive look so completely effortless. And that’s exactly what these Halloween Rice Krispie Treat Pumpkins are all about.
You know that feeling when you want to bring something amazing to a gathering but you also don’t want to spend three hours in the kitchen or stress about whether it’ll turn out? That’s this recipe. These little pumpkins are cute enough to steal the show at any Halloween party, potluck, or family dinner, but they come together in under 30 minutes with ingredients you probably already have in your pantry. No baking, no complicated techniques, no stress. Just a little food coloring, some marshmallows, and a whole lot of seasonal charm.
I’ve made these for three Halloweens in a row now, and every single time, someone asks for the recipe. They disappear faster than the candy bowl, and honestly, I love how they make me look like I put in way more effort than I actually did. That’s the kind of recipe worth keeping around. So let me show you how to make these little guys.
Why You’ll Love This Recipe
Look, I’ve tested a lot of Halloween treats over the years. Some were adorable but took forever. Others were quick but looked like a hot mess. These Halloween Rice Krispie Treat Pumpkins hit that sweet spot where they’re genuinely easy to make but look like you spent hours on them. Here’s why they keep showing up on my table year after year:
- Quick & Easy: From start to finish, you’re looking at about 20 minutes of active work. The hardest part is waiting for them to set, and even that only takes about 30 minutes in the fridge. Perfect for last-minute Halloween plans or when the kids announce they need treats for school tomorrow.
- Simple Ingredients: You need exactly six ingredients. Butter, marshmallows, Rice Krispies cereal, orange food coloring, green candy melts, and chocolate chips. That’s it. No specialty baking stores required.
- Perfect for Halloween Gatherings: Whether it’s a classroom party, a neighborhood potluck, or your own Halloween dinner, these little pumpkins fit right in. They’re portable, they’re mess-free, and they’re instantly recognizable as something festive.
- Crowd-Pleaser: Kids love them because they’re cute and sweet. Adults love them because they’re nostalgic and not too heavy. I’ve never brought a batch anywhere that didn’t get completely cleaned out.
- Unbelievably Delicious: Let’s be real. Rice Krispie treats are already perfect. Adding a little orange color and shaping them into pumpkins doesn’t change the fact that they’re chewy, buttery, marshmallow perfection. The chocolate chip stem and green drizzle just make them look as good as they taste.
What makes these different from every other Halloween treat out there is how foolproof they are. I’ve made them with burnt marshmallows (don’t ask), with too much food coloring, and even with generic crispy rice cereal that didn’t puff as well. They still turned out great. This isn’t a recipe that punishes you for small mistakes. It’s forgiving, it’s fun, and it’s exactly the kind of thing you want to bring to a party when you want to impress without the stress.
There’s something about handing a plate of these to a host that just feels good. Like you’re saying, “I care enough to make something special, but I’m not trying too hard.” And honestly, that’s the vibe we’re all going for, right?
What Ingredients You Will Need
This recipe uses simple, everyday ingredients to create something that looks way more impressive than it actually is. You probably already have most of these in your kitchen right now. Here’s what you’ll need and why each ingredient matters:
For the Pumpkin Treat Base
- 3 tablespoons unsalted butter (plus extra for greasing your hands and the pan) – The butter adds richness and helps the marshmallows melt smoothly. I prefer unsalted so I can control the salt level, but salted butter works in a pinch. Just skip any extra salt.
- 1 package (10 ounces) regular marshmallows (about 40 large marshmallows) – Regular marshmallows give the best texture. Mini marshmallows melt faster but can get a little gummy if you’re not careful. Jet-Puffed is my go-to brand for consistent results.
- 6 cups Rice Krispies cereal (or any crispy rice cereal) – The original is classic for a reason, but store brands work fine too. Just make sure it’s fresh and crispy. Stale cereal will give you sad, soggy pumpkins.
- Orange gel food coloring (about 1/2 teaspoon, or more for deeper color) – Gel food coloring is key here. Liquid food coloring will make your mixture too wet and can mess with the texture. I use Wilton’s orange gel, and it gives the perfect pumpkin hue without staining your hands too badly.
- Pinch of salt (optional, but recommended) – A tiny pinch of salt balances the sweetness and makes the buttery flavor pop. Trust me on this one.
For the Pumpkin Stems and Vines
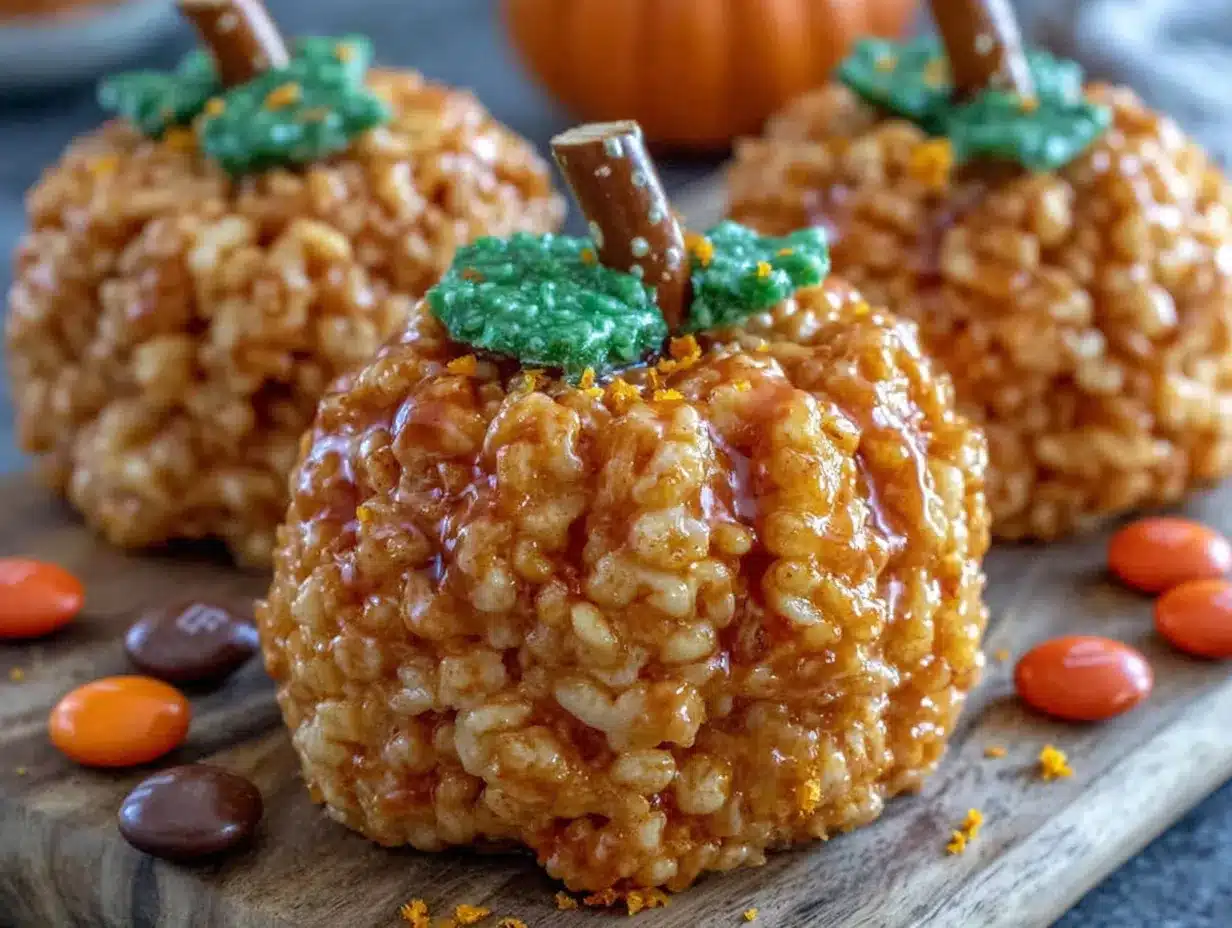
- 1/2 cup green candy melts (or green melting wafers) – These create the little vine-like drizzle on top. Wilton’s green candy melts work beautifully. If you can’t find them, white chocolate chips with a drop of green gel food coloring will do the trick.
- 1/2 cup semi-sweet chocolate chips (or milk chocolate chips) – These become the pumpkin stems. Semi-sweet gives a nice contrast to the sweet marshmallow base, but milk chocolate works if you prefer a sweeter treat.
- 1 teaspoon coconut oil or vegetable shortening (optional, for thinning the candy melts) – A tiny bit helps the candy melts drizzle more smoothly. If your melts are already nice and fluid, you can skip it.
Ingredient Selection Tips
When I make these Halloween Rice Krispie Treat Pumpkins, I always use fresh marshmallows. Old marshmallows get hard and don’t melt as evenly, which leads to lumpy treats. Same goes for the cereal. If your box has been open for more than a week, it’s worth grabbing a fresh one. Stale cereal loses its crunch, and that’s the whole point of a Rice Krispie treat.
For the orange color, don’t be shy. The marshmallow mixture tends to lighten as you mix in the cereal, so go a shade darker than you think you need. I usually start with 1/2 teaspoon of gel and add more if the color looks too pale. You want these to scream “pumpkin,” not “peach.”
And here’s a little trick I learned the hard way. If you’re making these for a party and want to avoid orange-stained hands, keep a small bowl of water nearby and dip your fingers in it before pressing the mixture into the molds. The water creates a barrier so the marshmallow doesn’t stick to your skin, and it helps you shape the pumpkins more smoothly.
Equipment Needed
You don’t need any fancy equipment for these Halloween Rice Krispie Treat Pumpkins, which is part of why I love them. Here’s what you’ll need:
- Large saucepan or pot (4-quart size works great) – You need enough room to melt the marshmallows and stir in the cereal without spilling over. A non-stick pot makes cleanup way easier.
- Rubber spatula or wooden spoon – For stirring the marshmallow mixture. A silicone spatula is my favorite because it scrapes the sides clean and doesn’t scratch your pot.
- Pumpkin-shaped silicone mold (about 2-inch cavities) – These are the secret to getting that perfect pumpkin shape. You can find them at craft stores, baking supply shops, or online for under $10. If you don’t have a pumpkin mold, you can shape the mixture into balls and use a knife to score lines, but the mold makes it so much easier.
- Small microwave-safe bowl – For melting the green candy melts and chocolate chips.
- Piping bag or small zip-top bag – For drizzling the green vines. A zip-top bag with the corner snipped off works perfectly and costs nothing.
- Baking sheet or plate (lined with parchment paper) – For placing the finished pumpkins while they set.
- Measuring cups and spoons – For accurate ingredient amounts.
If you don’t have a pumpkin mold, don’t let that stop you. I’ve made these by pressing the mixture into a greased 9×13 pan and using a round cookie cutter to punch out circles, then adding the stem and vines by hand. They won’t look as sculpted, but they’ll still taste amazing. You could also just shape them into balls and call them “pumpkin bites.” No one will complain.
One tip on the mold. Wash it thoroughly before first use, even if it says non-stick. A light coating of cooking spray or butter before you press in the mixture helps the pumpkins pop out cleanly. I learned this after my first batch came out looking more like lumpy orange blobs than pumpkins.
Preparation Method
Alright, let’s make some Halloween Rice Krispie Treat Pumpkins. The whole process takes about 20 minutes of active work, plus 30 minutes for the treats to set. Here’s how it goes:
- Prep your workspace. Before you do anything else, line a baking sheet with parchment paper. Lightly grease your pumpkin mold with butter or cooking spray. Set both aside. Trust me, once the marshmallow mixture is ready, you won’t want to be hunting for supplies.
- Melt the butter and marshmallows. Place the 3 tablespoons of butter in a large saucepan over medium-low heat. Stir until the butter is completely melted. Add the entire package of marshmallows and stir continuously. The key here is low and slow. If your heat is too high, the marshmallows will scorch and turn into a hard, grainy mess. You want them to melt into a smooth, glossy puddle. This takes about 5-7 minutes. When the mixture is completely smooth with no lumps, remove the pot from the heat.
- Add the orange color. Stir in about 1/2 teaspoon of orange gel food coloring. Mix until the color is evenly distributed. The mixture will look a little darker than you want at this stage, but it will lighten when you add the cereal. If it looks too pale, add another 1/4 teaspoon. Keep stirring until you get that perfect pumpkin orange.
- Fold in the cereal. Add the 6 cups of Rice Krispies cereal all at once. Fold gently with your spatula until the cereal is completely coated in the marshmallow mixture. Be careful not to crush the cereal too much. You want those little puffs to stay intact for the best texture. This takes about 2 minutes of gentle folding.
- Let it cool slightly. Let the mixture sit in the pot for 2-3 minutes. It needs to be cool enough to handle but still warm enough to shape. If you try to work with it while it’s piping hot, you’ll burn your fingers. Too cold, and it won’t press into the molds properly.
- Grease your hands. Rub a little butter or cooking spray on your hands. This is non-negotiable. The marshmallow mixture is sticky, and greased hands are the only way to work with it without losing your mind.
- Press into the molds. Take a small handful of the mixture (about the size of a golf ball) and press it firmly into one of the pumpkin mold cavities. Make sure it fills all the ridges and the top is flat. Don’t be gentle here. You want the mixture to take the shape of the mold completely. Repeat until all the cavities are filled or you run out of mixture. This recipe makes about 12-14 pumpkins, depending on the size of your mold.
- Let them set. Place the filled mold in the refrigerator for 20-30 minutes. This helps the pumpkins firm up so they pop out cleanly. If you’re in a hurry, 15 minutes in the freezer works too, but watch them closely so they don’t get rock hard.
- Pop them out. Once the pumpkins are firm, gently press on the back of each mold cavity to release them. If they stick, run a butter knife around the edges. Place each pumpkin on your parchment-lined baking sheet.
- Make the stems. In a small microwave-safe bowl, melt the 1/2 cup of chocolate chips in 20-second intervals, stirring between each, until smooth. Spoon a tiny amount (about 1/4 teaspoon) onto the top center of each pumpkin. This forms the stem. Let the chocolate set for about 5 minutes at room temperature, or pop them in the fridge for 2 minutes.
- Add the green vines. In another small bowl, melt the green candy melts the same way. If the mixture is too thick, stir in 1 teaspoon of coconut oil to thin it out. Transfer the melted candy to a small piping bag or a zip-top bag with a tiny corner snipped off. Drizzle thin green lines over the top of each pumpkin, starting from the stem and curling outward. This gives them that cute vine look.
- Final set. Let the pumpkins sit at room temperature for about 15 minutes so the chocolate and candy melts fully harden. Then they’re ready to serve.
A quick note on timing. If you’re making these for a party, you can do steps 1 through 8 the night before. Keep the molded pumpkins in the fridge overnight, then add the stems and vines the next day. This actually works better because the treats are fully set and easier to decorate.
Cooking Tips & Techniques
After making these Halloween Rice Krispie Treat Pumpkins more times than I can count, I’ve picked up a few tricks that make the process smoother and the results better. Here’s what I wish someone had told me the first time:
Don’t overheat the marshmallows. This is the most common mistake I see. People crank up the heat to speed things along, and the marshmallows turn into a hard, sugary mess. Keep the heat on medium-low and stir constantly. The marshmallows should melt into a smooth liquid, not bubble or brown. If you see any browning, you’ve gone too far. Pull the pot off the heat immediately.
Work fast but carefully. Once the marshmallow mixture is ready, you have about 10 minutes before it starts to set. That’s plenty of time to fold in the cereal and press it into the molds, but you don’t want to dawdle. Have everything prepped and ready before you start melting. I learned this the hard way when I had to scrape half-set mixture out of the pot with my bare hands.
Use gel food coloring, not liquid. I cannot stress this enough. Liquid food coloring adds extra moisture that can make your treats soggy and the color won’t be as vibrant. Gel food coloring gives you that rich, true orange without messing with the texture. Wilton and Americolor are both reliable brands.
Press firmly into the molds. If you don’t press the mixture firmly enough, your pumpkins will come out with air pockets and missing ridges. Use your thumbs to really pack the mixture into every nook and cranny of the mold. The top should be flat and smooth when you’re done.
Chill before unmolding. I know it’s tempting to pop them out right away, but the fridge time is crucial. The treats need to firm up so they hold their shape. If you try to unmold them while they’re still warm, they’ll fall apart. Be patient. Twenty minutes in the fridge makes all the difference.
If the mixture gets too hard to work with. Sometimes the marshmallow mixture starts setting before you’ve filled all the molds. Don’t panic. Pop the pot back on low heat for 30 seconds and stir until it softens up. You can do this once or twice without ruining the texture. Any more than that, and the treats will get tough.
Make extra for snacking. Let’s be real. You’re going to eat some of the mixture while you’re shaping these. It’s inevitable. Make a little extra so you don’t run out of pumpkins for your party. I usually add an extra cup of cereal and a handful of marshmallows to the recipe to account for “quality control.”
Variations & Adaptations
One of the best things about these Halloween Rice Krispie Treat Pumpkins is how easy they are to customize. Here are some variations I’ve tried and loved:
Ghost Treats
Skip the orange food coloring and keep the mixture white. Shape into ghost shapes using a ghost mold or just form them into rounded blobs. Use mini chocolate chips for eyes and a mouth. These are perfect if you want a mix of Halloween shapes on your platter.
Chocolate Pumpkin Base
Add 2 tablespoons of cocoa powder to the marshmallow mixture along with the orange food coloring. This gives you a chocolate pumpkin with a deeper, richer flavor. The orange color won’t be as bright, but the chocolate-marshmallow combo is incredible. My kids request this version every year.
Peanut Butter Pumpkins
Stir in 1/4 cup of creamy peanut butter along with the marshmallows. The peanut butter adds a savory note that balances the sweetness beautifully. Use milk chocolate chips for the stems to lean into the peanut butter cup vibe. These disappear fastest at parties.
Gluten-Free Option
Rice Krispies are naturally gluten-free, but some brands use malt flavoring that contains gluten. Look for a certified gluten-free crispy rice cereal. Nature’s Path and Erewhon both make excellent options. Everything else in the recipe is already gluten-free.
Vegan Version
Use vegan marshmallows (Dandies is my favorite brand) and plant-based butter. Most crispy rice cereals are vegan, but double-check the label. The chocolate chips and candy melts should also be dairy-free. This version works perfectly and tastes just as good as the original.
Spiced Pumpkin Treats
Add 1 teaspoon of pumpkin pie spice to the marshmallow mixture along with the orange food coloring. The cinnamon, nutmeg, and ginger give these a warm fall flavor that’s perfect for Halloween. I like to use white chocolate stems on these ones for a pretty contrast.
I’ve tried all of these variations, and honestly, they’re all winners. The peanut butter version is my personal favorite, but the spiced one is a close second. Don’t be afraid to experiment. These treats are forgiving enough that you can play around without worrying about ruining them.
Serving & Storage Suggestions
These Halloween Rice Krispie Treat Pumpkins are at their best when served at room temperature. The texture is chewy and soft, and the chocolate stem stays firm but not hard. If you’ve kept them in the fridge, let them sit out for about 10 minutes before serving so they soften up a bit.
For presentation, I like to arrange them on a large platter with some fake autumn leaves or mini pumpkins scattered around. They also look cute on a tiered tray with other Halloween treats like ghost cookies or candy corn. If you’re bringing them to a party, a simple white plate lets the orange pumpkins really pop.
These pair beautifully with warm apple cider, hot chocolate, or a pumpkin spice latte. For a grown-up gathering, they’re great alongside a glass of bourbon or a dark stout beer. The sweetness of the treats balances the bitterness of the drinks perfectly.
Storage: Keep the pumpkins in an airtight container at room temperature for up to 3 days. If you stack them, place a sheet of parchment paper between the layers so the chocolate doesn’t smudge. Do not refrigerate them for long-term storage unless you absolutely have to. The fridge dries them out and makes them hard.
Freezer: These freeze beautifully for up to 2 months. Place the pumpkins in a single layer on a baking sheet and freeze for 1 hour, then transfer to a freezer-safe bag or container. To thaw, leave them at room temperature for about 20 minutes. The texture will be slightly softer than fresh, but they’ll still taste fantastic.
Make-Ahead Tip: You can prepare the pumpkin bases (steps 1-8) up to 2 days in advance. Keep them in the mold in the fridge, then add the stems and vines the day you plan to serve them. This makes party prep so much easier. I do this for every Halloween gathering, and it saves me so much stress.
One thing I’ve noticed is that these treats actually taste better the next day. The flavors meld together, and the texture gets even chewier and more satisfying. So don’t feel like you have to make them fresh on the day of your party. Making them a day ahead is actually the smarter move.
Nutritional Information & Benefits
Let’s be honest. These Halloween Rice Krispie Treat Pumpkins are a treat, not a health food. But that doesn’t mean they can’t fit into a balanced diet. Here’s the estimated nutritional breakdown for one pumpkin (based on 12 servings):
- Calories: Approximately 180-200
- Total Fat: 6-8 grams
- Saturated Fat: 3-4 grams
- Carbohydrates: 30-35 grams
- Sugar: 18-22 grams
- Protein: 2-3 grams
- Sodium: 120-150 mg
These numbers will vary depending on the exact brands you use and how big you make your pumpkins. The chocolate stem and green drizzle add a small amount of fat and sugar, but it’s minimal compared to the marshmallow base.
On the positive side, Rice Krispies are fortified with iron and B vitamins, so there’s a tiny nutritional boost there. The butter provides a small amount of vitamin A, and if you use dark chocolate chips for the stems, you get a little dose of antioxidants. Is it enough to call these healthy? No. But it’s nice to know they’re not completely empty calories.
For those with dietary concerns, this recipe contains gluten (unless you use certified gluten-free cereal) and dairy. The marshmallows contain gelatin, so they’re not vegetarian or vegan. I’ve included substitution options in the variations section for anyone who needs them.
My personal philosophy on treats like these is simple. Halloween comes once a year. Enjoy the pumpkin. Eat the candy. Don’t stress about the numbers. Balance comes from the big picture, not from one plate of Rice Krispie treats at a party. That said, these are rich and sweet, so one or two is usually plenty to satisfy that Halloween craving.
Conclusion
These Halloween Rice Krispie Treat Pumpkins have become my go-to for every Halloween gathering, and I don’t see that changing anytime soon. They’re fun to make, adorable to look at, and absolutely delicious to eat. The best part? They make you look like you put in way more effort than you actually did. And honestly, isn’t that the dream?
I love that this recipe is forgiving enough for beginners but impressive enough for experienced bakers. I love that it uses simple ingredients I already have in my pantry. And I really love watching people’s faces light up when they see a plate of these little orange pumpkins at a party. There’s something about them that just feels like Halloween.
So go ahead and give these a try. Customize them however you like. Make them with your kids, bring them to a potluck, or just make a batch for yourself on a cozy October afternoon. However you choose to enjoy them, I promise they’ll become a tradition in your house too.
If you make these Halloween Rice Krispie Treat Pumpkins, I’d love to hear how they turned out. Drop a comment below and let me know if you tried any variations, or share a photo of your pumpkins. And if you’re looking for more Halloween treats, check out our spiderweb dip recipe or these mummy hot dogs for a savory option. Happy Halloween, and happy snacking!
Frequently Asked Questions
Can I use liquid food coloring instead of gel?
You can, but I don’t recommend it. Liquid food coloring adds extra moisture that can make your treats soggy, and the color won’t be as vibrant. Gel food coloring gives you that rich, true orange without messing with the texture. If liquid is all you have, use about 1 teaspoon and expect a slightly softer treat.
How do I keep the mixture from sticking to my hands?
Grease your hands with butter or cooking spray before handling the mixture. Keep a small bowl of water nearby and dip your fingers in it periodically. The water creates a barrier between the marshmallow and your skin, making it much easier to shape the pumpkins without everything turning into a sticky mess.
Can I make these without a pumpkin-shaped mold?
Absolutely. Press the mixture into a greased 9×13 pan and let it set. Use a round cookie cutter to punch out circles, then add the chocolate stem and green drizzle on top. They won’t have the ridges of a pumpkin, but they’ll still look cute and festive. You can also shape the mixture into balls by hand and use a knife to score lines.
How far in advance can I make these?
You can make the pumpkin bases up to 2 days in advance. Keep them in the mold in the fridge, then add the stems and vines the day you plan to serve. Fully decorated pumpkins are best within 3 days at room temperature. They also freeze well for up to 2 months if you want to get a head start on your Halloween prep.
Why did my pumpkins turn out hard instead of chewy?
This usually happens when the marshmallows are overheated. If the mixture gets too hot, the sugar crystallizes and the treats turn hard. Keep the heat on medium-low and stir constantly. Pull the pot off the heat as soon as the marshmallows are fully melted. Also, make sure you’re using fresh marshmallows. Old ones don’t melt as evenly and can lead to a tougher texture.
Pin This Recipe!
Easy Halloween Rice Krispie Treat Pumpkins Recipe
These adorable Halloween Rice Krispie Treat Pumpkins are quick, easy, and made with simple ingredients. Perfect for parties, they come together in under 30 minutes and are a crowd-pleasing festive treat.
- Prep Time: 20 minutes
- Cook Time: 10 minutes
- Total Time: 30 minutes (plus 30 minutes chilling)
- Yield: 12-14 servings 1x
- Category: Dessert
- Cuisine: American
Ingredients
- 3 tablespoons unsalted butter (plus extra for greasing)
- 1 package (10 ounces) regular marshmallows (about 40 large)
- 6 cups Rice Krispies cereal
- 1/2 teaspoon orange gel food coloring (or more for deeper color)
- Pinch of salt (optional)
- 1/2 cup green candy melts
- 1/2 cup semi-sweet chocolate chips
- 1 teaspoon coconut oil or vegetable shortening (optional, for thinning candy melts)
Instructions
- Prep your workspace: Line a baking sheet with parchment paper. Lightly grease a pumpkin-shaped silicone mold with butter or cooking spray.
- Melt the butter and marshmallows: In a large saucepan over medium-low heat, melt 3 tablespoons butter. Add the marshmallows and stir continuously until smooth and glossy, about 5-7 minutes. Remove from heat.
- Add the orange color: Stir in 1/2 teaspoon orange gel food coloring until evenly distributed. Add more if needed for a deeper orange.
- Fold in the cereal: Add 6 cups Rice Krispies cereal and fold gently until completely coated, about 2 minutes.
- Let it cool slightly: Let the mixture sit in the pot for 2-3 minutes until cool enough to handle but still warm.
- Grease your hands: Rub butter or cooking spray on your hands to prevent sticking.
- Press into the molds: Take a golf ball-sized handful of mixture and press firmly into each mold cavity, filling all ridges. Repeat until all cavities are filled (makes about 12-14 pumpkins).
- Let them set: Refrigerate the filled mold for 20-30 minutes until firm.
- Pop them out: Gently press on the back of each cavity to release the pumpkins. Place on parchment-lined baking sheet.
- Make the stems: In a small microwave-safe bowl, melt 1/2 cup chocolate chips in 20-second intervals, stirring between each, until smooth. Spoon about 1/4 teaspoon onto the top center of each pumpkin. Let set for 5 minutes at room temperature or 2 minutes in the fridge.
- Add the green vines: In another bowl, melt green candy melts the same way. If too thick, stir in 1 teaspoon coconut oil. Transfer to a piping bag or zip-top bag with a tiny corner snipped off. Drizzle thin green lines over the top of each pumpkin, starting from the stem and curling outward.
- Final set: Let pumpkins sit at room temperature for about 15 minutes until chocolate and candy melts are fully hardened. Serve at room temperature.
Notes
Use gel food coloring for best results; liquid will make treats soggy. Grease hands with butter or water to prevent sticking. For make-ahead, prepare bases up to 2 days in advance and add stems/vines the day of serving. Store in an airtight container at room temperature for up to 3 days or freeze for up to 2 months.
Nutrition
- Serving Size: 1 pumpkin
- Calories: 190
- Sugar: 20
- Sodium: 135
- Fat: 7
- Saturated Fat: 3.5
- Carbohydrates: 33
- Fiber: 1
- Protein: 2.5
Keywords: Halloween, Rice Krispie treats, pumpkins, no-bake, easy, kid-friendly, party treat