Love this? Save it for later!
Share the inspiration with your friends
My neighbor wasn’t trying to impress anyone. I’d stopped by to borrow a ladder on a chilly October afternoon, and the smell hit me before I even got to her back door. Butter, brown sugar, cinnamon—but there was something else. Something deeper, almost savory, that I couldn’t quite place.
“Oh, that’s just my apple crisp,” she said when I asked, waving her hand like it was nothing. Like she hadn’t just created the kind of aroma that makes you want to cancel your whole afternoon and sit in someone’s kitchen forever. She pulled it out of the oven, and honestly? I almost forgot about the ladder entirely.
The thing about this particular salted caramel apple crisp is that it doesn’t try to be fancy. It’s not layered with complicated techniques or ingredients you have to hunt down at three different stores. It’s just really, really good—the kind of dessert that makes people close their eyes after the first bite. I stood there in her kitchen, eating a warm spoonful straight from the dish, and I knew I’d be making this for years to come.
That was three autumns ago, and I’ve probably made this recipe two dozen times since. I’ve tweaked it here and there—added more salt, played with the oat-to-apple ratio, figured out the trick for getting that crumble extra crispy on top. Maybe you’ve been there, hunting for that one dessert that feels special but never stressful. This is that recipe. Let me show you how to make it.
Why You’ll Love This Recipe
I’ve tested a lot of apple crisp recipes over the years. Some were too soggy. Some had a crumble that turned into a sad, soft paste. Some just didn’t have enough going on flavor-wise. This one? It’s different, and here’s why.
- Quick & Easy: From start to oven in about 20 minutes. No pastry rolling, no pie crust drama. Just chop, mix, and bake.
- Simple Ingredients: You probably have most of this in your pantry right now. The salted caramel comes together with stuff you already own—no candy thermometer required.
- Perfect for Fall Gatherings: Thanksgiving, Friendsgiving, cozy Sunday dinners—this dish disappears fast, and people always ask for the recipe.
- Crowd-Pleaser: Kids love the sweet oat crumble. Adults go crazy for that salted caramel kick. It’s the rare dessert that truly works for everyone.
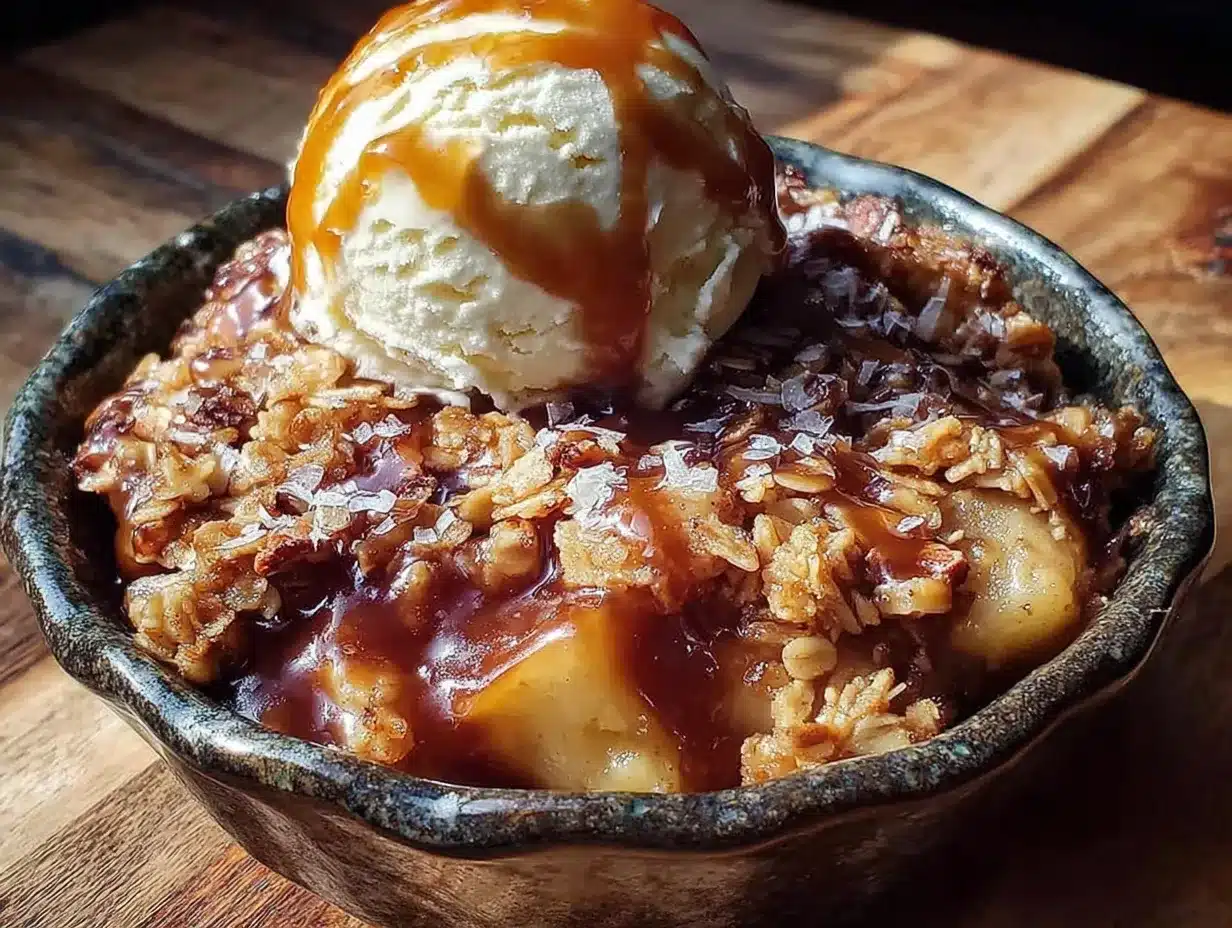
- Unbelievably Delicious: The texture is where this recipe shines. Soft, jammy apples underneath a crunchy, buttery oat topping, all tied together with a homemade salted caramel that seeps down into every layer.
What makes this version stand out from every other apple crisp out there is the technique. Most recipes just dump caramel on top and call it a day. I worked out a method where the caramel gets swirled into the apples and drizzled over the crumble, so every bite has that sweet-salty magic. I also swapped in a higher proportion of oats to flour in the topping, which gives you that craggy, crispy texture that stays crunchy even the next day.
This is comfort food at its finest—the kind that makes you slow down and actually taste what you’re eating. It’s impressive enough for company but easy enough for a random Tuesday night when you just need something warm and sweet.
What Ingredients You Will Need
This recipe uses simple, honest ingredients that work together to create something truly special. Most of these are pantry staples, which means you can probably make this right now without a trip to the store.
For the Apple Filling
- 6-7 medium apples, peeled, cored, and sliced (about 6 cups) — I prefer a mix of Granny Smith and Honeycrisp. The tartness of the Granny Smith balances the sweetness, while Honeycrisp holds its shape beautifully during baking.
- 3 tablespoons granulated sugar (adds just enough sweetness without overpowering the fruit)
- 2 tablespoons brown sugar, packed (adds depth and a hint of molasses flavor)
- 1 tablespoon lemon juice, freshly squeezed (prevents browning and brightens the apple flavor)
- 1 teaspoon ground cinnamon (the backbone of any good apple dessert)
- 1/4 teaspoon ground nutmeg, freshly grated if possible (adds warmth without stealing the show)
- 1 tablespoon cornstarch (helps thicken the juices so you don’t end up with a watery filling)
- Pinch of salt (makes everything taste more like itself)
For the Salted Caramel
- 1/2 cup granulated sugar (regular white sugar works perfectly here)
- 3 tablespoons unsalted butter, cut into small pieces (use a good brand like Kerrygold for richer flavor)
- 1/3 cup heavy cream, room temperature (cold cream will seize the caramel, so let it sit out for 10 minutes)
- 1 teaspoon flaky sea salt, plus more for finishing (Maldon or fleur de sel are ideal)
- 1/2 teaspoon vanilla extract (pure, not imitation)
For the Oat Crumble Topping
- 1 cup old-fashioned rolled oats (not quick oats—they turn mushy. I use Bob’s Red Mill)
- 3/4 cup all-purpose flour (spooned and leveled for accuracy)
- 1/2 cup brown sugar, packed (dark brown sugar gives a deeper flavor, but light works too)
- 1/4 cup granulated sugar
- 1/2 teaspoon ground cinnamon
- 1/4 teaspoon salt
- 1/2 cup unsalted butter, cold and cut into small cubes (this is crucial for a crumbly texture)
Substitution Notes: For a gluten-free version, swap the all-purpose flour with a 1:1 gluten-free baking flour blend. Use certified gluten-free oats. For a dairy-free option, substitute the butter in the crumble with cold coconut oil or a plant-based butter stick. The caramel won’t work the same with non-dairy butter, so you can skip it and just use a store-bought dairy-free caramel sauce with flaky salt on top.
Equipment Needed
You don’t need a fancy kitchen to make this recipe. Here’s what you’ll actually use:
- 9×13-inch baking dish (a 2-quart dish works too, but the baking time might shift by 5-10 minutes)
- Large mixing bowl for the apples
- Medium mixing bowl for the crumble topping
- Small saucepan for the caramel (light-colored metal is best so you can see the color change)
- Chef’s knife and cutting board
- Measuring cups and spoons
- Rubber spatula for folding the crumble
- Pastry cutter or your fingertips for cutting butter into the flour mixture
- Whisk for the caramel
- Parchment paper (optional but helpful for easy cleanup)
If you don’t have a pastry cutter, honestly, your hands work just fine. I actually prefer using my fingers because I can feel when the butter is the right size—small pea-sized pieces that are still visible in the flour mixture. That’s what gives you those gorgeous buttery clumps in the baked topping.
One tip: invest in a good vegetable peeler. A cheap one will make peeling six apples feel like a workout. I use a Kuhn Rikon swivel peeler and it glides through apple skin like butter.
Preparation Method
Let’s walk through this step by step. I’ve made this enough times to know exactly where things can go wrong, so I’ll point those out along the way.
Step 1: Make the Salted Caramel (10 minutes)
Start with the caramel because it needs to cool slightly before you use it. Place the 1/2 cup of granulated sugar in a small, light-colored saucepan over medium heat. Don’t stir it—just let it sit. I know it’s tempting to poke at it, but trust me, stirring at this stage can cause the sugar to crystallize. Swirl the pan gently if you need to move things around. After about 5-7 minutes, the sugar will melt into a deep amber liquid. Watch it carefully—it goes from perfect to burnt in about 30 seconds.
Once it’s a beautiful copper color, remove it from the heat and immediately whisk in the butter pieces. The mixture will bubble up violently—that’s normal. Keep whisking until the butter is fully melted and incorporated. Slowly drizzle in the heavy cream while whisking constantly. Again, it will steam and bubble. Keep going until it’s smooth. Stir in the vanilla and flaky sea salt. Set it aside to cool while you prep everything else.
Heads up: If your caramel seizes up or turns into a hard lump, don’t panic. Put it back over low heat and gently whisk until it smooths out. This happens sometimes if your cream was too cold. It still tastes great.
Step 2: Prepare the Apples (15 minutes)
Preheat your oven to 375°F (190°C). Peel, core, and slice your apples into 1/4-inch thick pieces. I aim for slices that are all roughly the same size so they cook evenly. If some are thicker than others, they’ll end up crunchy while the thin ones turn to mush.
In a large mixing bowl, toss the apple slices with the granulated sugar, brown sugar, lemon juice, cinnamon, nutmeg, cornstarch, and that pinch of salt. Use your hands to really coat every slice. Let the apples sit for 5 minutes while you make the crumble. This resting time lets the sugar start drawing out the apple juices, which will turn into that gorgeous syrupy sauce during baking.
Step 3: Make the Oat Crumble (5 minutes)
In a medium bowl, whisk together the oats, flour, brown sugar, granulated sugar, cinnamon, and salt. Add the cold butter cubes. Use a pastry cutter or your fingertips to work the butter into the dry ingredients until the mixture looks like coarse sand with some pea-sized butter chunks remaining. Don’t overdo it—those little butter lumps are what create crispy, golden clusters on top of the crisp. If the mixture looks dry, you can add one more tablespoon of cold butter.
Step 4: Assemble the Crisp (5 minutes)
Spread the apple mixture evenly in your 9×13-inch baking dish. Drizzle about half of the salted caramel over the apples, then gently toss them with a spatula to distribute it. You want that caramel flavor throughout, not just on top.
Sprinkle the oat crumble evenly over the apples. Don’t press it down—you want it to sit loosely so it bakes up light and crunchy. Drizzle the remaining caramel over the top of the crumble. I like to be generous here, letting it pool in some spots and drip down the sides.
Finish with an extra pinch of flaky sea salt scattered over the whole thing. This final touch makes a real difference—trust me.
Step 5: Bake (40-45 minutes)
Place the dish on a baking sheet lined with parchment paper to catch any bubbly overflow. Bake at 375°F (190°C) for 40-45 minutes, or until the filling is bubbling around the edges and the topping is deep golden brown. If the crumble is browning too quickly around the 30-minute mark, tent loosely with foil for the remaining time.
Let the crisp cool on a wire rack for at least 15 minutes before serving. This is important—the filling needs time to set up. If you dig in right away, you’ll get a soupy mess. I know it’s hard to wait, but your patience will be rewarded.
Cooking Tips & Techniques
After making this recipe more times than I can count, here are the things I wish someone had told me from the start.
Use a mix of apple varieties. I learned this the hard way after making a crisp with all Granny Smith apples that turned out so tart I had to add more sugar halfway through. A 50/50 mix of tart and sweet apples gives you the best balance of flavor and texture. Honeycrisp, Fuji, or Braeburn are my go-to sweet apples.
Don’t skip the cornstarch. I once thought I could leave it out because “the apples will thicken on their own.” They didn’t. I ended up with apple soup. The cornstarch absorbs the excess juice and creates that luscious, almost jammy consistency that makes this dessert so satisfying.
Cold butter is non-negotiable. If your butter is even slightly soft when you make the crumble, you’ll end up with a dense, greasy topping instead of those beautiful crispy clusters. I stick my butter in the freezer for 10 minutes before I start. It makes a noticeable difference.
Toast your oats for extra crunch. This is a pro tip I picked up from a pastry chef friend. Spread the oats on a baking sheet and toast them at 350°F for 5-7 minutes before adding them to the crumble mixture. They’ll stay crunchier during baking. I do this when I’m feeling extra fancy.
Watch your caramel like a hawk. The first time I made caramel, I walked away to answer a text and came back to a black, smoking mess. It goes from perfect to burnt in seconds. Stay at the stove, watch the color, and trust your eyes more than the timer.
Variations & Adaptations
One of the best things about this recipe is how easy it is to make it your own. Here are some variations I’ve tried and loved.
Gluten-Free Version: I made this for a friend with celiac disease and it turned out fantastic. Use a 1:1 gluten-free flour blend in place of the all-purpose flour, and make sure your oats are certified gluten-free. Everything else stays the same. The texture is slightly more delicate, but the flavor is spot on.
Vegan Option: This one takes a little more work, but it’s worth it. Use cold coconut oil or a high-quality vegan butter stick in the crumble instead of dairy butter. For the caramel, you can use a store-bought vegan caramel sauce (I like the one from Trader Joe’s) and just stir in some flaky salt. Skip the butter and cream in the homemade version—it won’t work the same with plant-based alternatives.
Add Some Pear: I tried swapping one apple for a ripe Bartlett pear once, and it was a game-changer. The pear adds a subtle floral sweetness that pairs beautifully with the caramel. Just make sure the pear is ripe but still firm so it holds its shape.
Spice It Up: If you’re a fan of warm spices, add 1/4 teaspoon of cardamom and a pinch of ground ginger to the apple mixture. It gives the crisp a chai-like warmth that’s perfect for cold winter nights.
Bourbon Caramel Variation: This is my personal favorite for adult gatherings. Add 1 tablespoon of bourbon to the caramel along with the vanilla. The alcohol mostly cooks off, leaving behind a rich, smoky depth that’s incredible with the apples.
Serving & Storage Suggestions
This salted caramel apple crisp is at its absolute best served warm, about 15-20 minutes after it comes out of the oven. The filling is still slightly saucy, the crumble is perfectly crunchy, and the caramel is gooey and irresistible.
I always serve it with a scoop of vanilla bean ice cream. The cold creaminess against the warm, spiced apples is pure magic. A dollop of lightly sweetened whipped cream works beautifully too. If you’re feeling extra indulgent, drizzle a little extra caramel sauce over the top and add another pinch of flaky salt.
For a fun brunch twist, I’ve served leftover crisp (reheated) with a side of plain Greek yogurt. The tanginess cuts through the sweetness perfectly. It’s not traditional, but it’s delicious.
Storage: Cover the dish tightly with foil or plastic wrap and store in the refrigerator for up to 4 days. The crumble will soften over time, but it’ll still taste wonderful. To reheat, pop individual portions in the microwave for 30-45 seconds, or reheat the whole dish in a 350°F oven for 10-15 minutes.
Freezer Instructions: This crisp freezes beautifully. Assemble the entire dish but don’t bake it. Wrap it tightly in a layer of plastic wrap, then a layer of foil, and freeze for up to 3 months. When you’re ready to bake, thaw it in the refrigerator overnight, then bake as directed, adding 10-15 minutes to the baking time since you’re starting from cold.
The flavors actually deepen and meld together more after a day in the fridge. I’ve been known to make this a day ahead of Thanksgiving just so the apples have time to really soak up all that caramel goodness.
Nutritional Information & Benefits
Let’s be real—this is dessert, not a health food. But that doesn’t mean it can’t have some redeeming qualities.
Estimated per serving (1/9 of recipe): 380 calories, 18g fat, 54g carbohydrates, 3g fiber, 36g sugar, 4g protein, 280mg sodium.
Apples are a solid source of fiber and vitamin C, especially if you leave the peels on (though I peel mine for texture in this recipe). Oats provide beta-glucan, a type of soluble fiber that’s great for heart health. The cinnamon in this recipe has anti-inflammatory properties and may help with blood sugar regulation.
Dietary Considerations: This recipe contains gluten (from the flour and oats) and dairy (butter and cream). It can be made gluten-free and vegan with the substitutions listed above. It is nut-free as written.
I personally love that this dessert feels indulgent but isn’t loaded with weird additives or preservatives. You know exactly what’s in it—real butter, real apples, real cream. Sometimes that’s exactly what you need.
Conclusion
This salted caramel apple crisp has become my go-to fall dessert for a reason. It’s forgiving enough for beginners, impressive enough for company, and just plain delicious enough to make any ordinary evening feel a little special. The combination of tender, spiced apples, buttery oat crumble, and that ribbon of homemade salted caramel running through every layer is something you have to taste to believe.
I hope you make this recipe your own. Maybe you’ll add extra cinnamon like I sometimes do. Maybe you’ll try the bourbon version for a dinner party. Maybe you’ll just follow it exactly as written and discover your new favorite comfort dessert. Whatever you choose, I’d love to hear about it.
Drop a comment below and let me know how it turned out—did you make any substitutions? Did the caramel give you trouble? Did your family ask for seconds (and thirds)? Your stories and questions help me create better recipes for all of us.
Now go preheat that oven. Your apples are waiting.
Frequently Asked Questions
Can I use quick oats instead of old-fashioned rolled oats?
I wouldn’t recommend it. Quick oats are cut into smaller pieces and processed more, which means they break down during baking and turn mushy. Old-fashioned rolled oats hold their shape and give you that satisfying crunchy texture. If you only have quick oats, you can use them, but expect a softer, less crispy topping.
Why did my caramel turn out grainy?
Grainy caramel usually means the sugar crystallized during cooking. This can happen if you stir the sugar while it’s melting, or if a bit of sugar splashes onto the sides of the pan and falls back in. To avoid this, use a clean, wet pastry brush to wipe down the sides of the pan before the sugar starts to melt. Also, don’t stir—just swirl the pan gently.
Can I make this recipe in advance?
Absolutely. You can assemble the entire crisp (without baking) up to 24 hours ahead, cover it, and store it in the refrigerator. When you’re ready to bake, add about 10 minutes to the baking time since you’re starting from cold. Alternatively, you can bake it fully, let it cool, and reheat individual portions in the microwave or oven.
What’s the best apple for baking in this crisp?
I recommend a mix of Granny Smith and Honeycrisp apples. Granny Smith holds its shape well and provides necessary tartness to balance the sweet caramel. Honeycrisp adds natural sweetness and a tender texture. Other good options include Braeburn, Fuji, or Pink Lady apples. Avoid Red Delicious—they turn into mush.
Can I use store-bought caramel sauce instead of making my own?
You can, but the results won’t be quite the same. Homemade salted caramel has a deeper, more complex flavor that really elevates the dish. If you’re short on time, look for a high-quality jarred caramel sauce (not the ice cream topping kind) and stir in some flaky salt. It’ll still be delicious, just not quite as amazing as the homemade version.
Pin This Recipe!

Ultimate Salted Caramel Apple Crisp with Perfect Oat Crumble

This salted caramel apple crisp features tender, spiced apples, a buttery oat crumble, and homemade salted caramel swirled throughout. It’s an easy, crowd-pleasing dessert perfect for fall gatherings.
- Prep Time: 20 minutes
- Cook Time: 45 minutes
- Total Time: 1 hour 5 minutes
- Yield: 9 servings 1x
- Category: Dessert
- Cuisine: American
Ingredients
- 6–7 medium apples, peeled, cored, and sliced (about 6 cups) — a mix of Granny Smith and Honeycrisp recommended
- 3 tablespoons granulated sugar
- 2 tablespoons brown sugar, packed
- 1 tablespoon lemon juice, freshly squeezed
- 1 teaspoon ground cinnamon
- 1/4 teaspoon ground nutmeg, freshly grated if possible
- 1 tablespoon cornstarch
- Pinch of salt
- 1/2 cup granulated sugar (for caramel)
- 3 tablespoons unsalted butter, cut into small pieces (for caramel)
- 1/3 cup heavy cream, room temperature (for caramel)
- 1 teaspoon flaky sea salt, plus more for finishing (for caramel)
- 1/2 teaspoon vanilla extract (for caramel)
- 1 cup old-fashioned rolled oats (for crumble)
- 3/4 cup all-purpose flour (for crumble)
- 1/2 cup brown sugar, packed (for crumble)
- 1/4 cup granulated sugar (for crumble)
- 1/2 teaspoon ground cinnamon (for crumble)
- 1/4 teaspoon salt (for crumble)
- 1/2 cup unsalted butter, cold and cut into small cubes (for crumble)
Instructions
- Make the salted caramel: Place 1/2 cup granulated sugar in a small, light-colored saucepan over medium heat. Do not stir; let it melt for 5-7 minutes until deep amber. Remove from heat, whisk in butter pieces until melted. Slowly drizzle in heavy cream while whisking constantly. Stir in vanilla and flaky sea salt. Set aside to cool.
- Preheat oven to 375°F (190°C). Peel, core, and slice apples into 1/4-inch thick pieces.
- In a large bowl, toss apple slices with granulated sugar, brown sugar, lemon juice, cinnamon, nutmeg, cornstarch, and salt. Let sit for 5 minutes.
- Make the oat crumble: In a medium bowl, whisk together oats, flour, brown sugar, granulated sugar, cinnamon, and salt. Cut in cold butter cubes using a pastry cutter or fingertips until mixture resembles coarse sand with some pea-sized butter chunks.
- Spread apple mixture evenly in a 9×13-inch baking dish. Drizzle about half the caramel over apples and gently toss to distribute.
- Sprinkle oat crumble evenly over apples. Drizzle remaining caramel over the top. Finish with an extra pinch of flaky sea salt.
- Place dish on a parchment-lined baking sheet. Bake at 375°F (190°C) for 40-45 minutes, until filling is bubbling and topping is deep golden brown. If browning too quickly, tent with foil after 30 minutes.
- Let cool on a wire rack for at least 15 minutes before serving.
Notes
For gluten-free: use 1:1 gluten-free flour blend and certified gluten-free oats. For dairy-free: use cold coconut oil or plant-based butter in crumble; skip homemade caramel and use store-bought dairy-free caramel with flaky salt. Cold butter is crucial for crumble texture. Watch caramel closely to avoid burning. Let crisp cool 15 minutes before serving to allow filling to set.
Nutrition
- Serving Size: 1/9 of recipe
- Calories: 380
- Sugar: 36
- Sodium: 280
- Fat: 18
- Saturated Fat: 11
- Carbohydrates: 54
- Fiber: 3
- Protein: 4
Keywords: apple crisp, salted caramel, fall dessert, apple dessert, oat crumble, easy dessert, comfort food