Love this? Save it for later!
Share the inspiration with your friends
“I never thought setting up a candy and dessert bar could turn into such an adventure,” my friend Jenna confessed as I helped her unpack a mountain of treats in her tiny apartment kitchen last spring. It was the night before her daughter’s graduation party, and honestly, the chaos was real—half the candy bags were torn, and somewhere in the frenzy, we realized we forgot the cake stand. But let me tell you, that imperfect night created the blueprint for what I now call the Perfect DIY Graduation Party Candy and Dessert Bar Setup.
Maybe you’ve been there yourself—trying to pull together a celebration that’s both festive and easy, especially when the clock is ticking. This setup isn’t about fancy event planning or expensive rentals. It’s about crafting a fun, colorful, and memorable candy and dessert display that feels personal and inviting, using simple tricks and a little creativity.
That night, as we improvised with mismatched jars and handwritten labels, I realized the magic wasn’t in perfection—it was in the joy of sharing sweet moments with friends and family. This guide will walk you through everything you need to create your own candy and dessert bar that’ll have guests talking and your grad feeling celebrated, without the stress. Let’s face it, celebrations are meant to be enjoyed, not frazzled!
Why You’ll Love This Recipe
Setting up the perfect DIY graduation party candy and dessert bar is easier than you think, and here’s why this method has become a favorite among my friends and readers:
- Quick & Easy: You can have your candy and dessert bar ready in under two hours, which is a lifesaver for last-minute celebrations or busy weekends.
- Simple Ingredients & Supplies: No need to hunt down specialty stores. Most of the candies, desserts, and decorations come from your local supermarket or dollar store.
- Perfect for Any Graduation Party: Whether it’s a small family gathering or a lively backyard bash, this setup scales beautifully.
- Crowd-Pleaser: From toddlers to grandparents, everyone’s drawn to the colorful spread—and yes, it’s a hit with picky eaters too!
- Unbelievably Customizable: The magic lies in how you mix and match treats, colors, and containers to fit your grad’s personality and party theme.
This isn’t just another candy bar setup. I’ve tested different layouts, container choices, and candy combos to find what brings the most smiles and least stress. The trick? Think of it as more than just sweets—it’s a visual centerpiece that brings your celebration alive.
Honestly, I love how this approach turns a simple table into a joyful experience, sparking conversations and those “remember when” moments. If you want a fuss-free way to make your grad’s day feel extra special, this guide is your new best friend.
What Ingredients You Will Need
This graduation party candy and dessert bar uses simple, crowd-pleasing treats and easy-to-find supplies. The ingredients are grouped by their role for quick prep and shopping.
- For the Candy Selection:
- Assorted gummy candies (e.g., bears, worms, fruit slices) – colorful and chewy favorites
- Chocolate-covered nuts or raisins – a touch of indulgence
- Hard candies (like lollipops or peppermint sticks) – add height and variety
- Mini candy bars or individually wrapped chocolates – perfect for grab-and-go
- For the Dessert Treats:
- Homemade or store-bought cupcakes – I recommend vanilla with buttercream frosting for classic appeal
- Brownie bites or cookie bars – easy to portion and always a hit
- Rice Krispies treats – simple to make and kid-approved
- Fresh fruit skewers – balance the sweetness with a refreshing touch
- For Decorative & Practical Elements:
- Clear glass jars or bowls in various sizes – for displaying candies attractively
- Small dessert plates and napkins – coordinate with your party colors
- Colorful scoops and tongs – for hygienic and fun candy serving
- Labels or chalkboard tags – to name each treat and add charm
When picking candies, I personally trust brands like Haribo for gummies and Ghirardelli for chocolate pieces—they consistently deliver great texture and flavor. For cupcakes, local bakeries often have wonderful options if you’re short on time. And if you want to swap ingredients for dietary needs, almond flour brownies or dairy-free cupcakes are excellent alternatives.
Equipment Needed
Setting up a candy and dessert bar doesn’t require fancy tools, but a few basics help keep things organized and attractive:
- Various sizes of clear jars, bowls, or apothecary containers – I like using thrifted glassware for an eclectic look
- Serving trays or tiered cake stands to add height and dimension
- Spoons, scoops, and tongs for easy, sanitary candy serving
- Small chalkboards or printable labels for naming treats (a bit of handwriting flair goes a long way)
- A tablecloth or runner that matches your theme colors – it sets the mood and hides any table imperfections
If you don’t have tiered stands, stack sturdy cake plates with small jars in between for a DIY riser effect. For budget-conscious setups, dollar store containers and colorful paper straws can add festive touches without breaking the bank. Keeping a lint roller handy is a secret weapon to clean up any stray candy wrappers or crumbs during the party.
Preparation Method
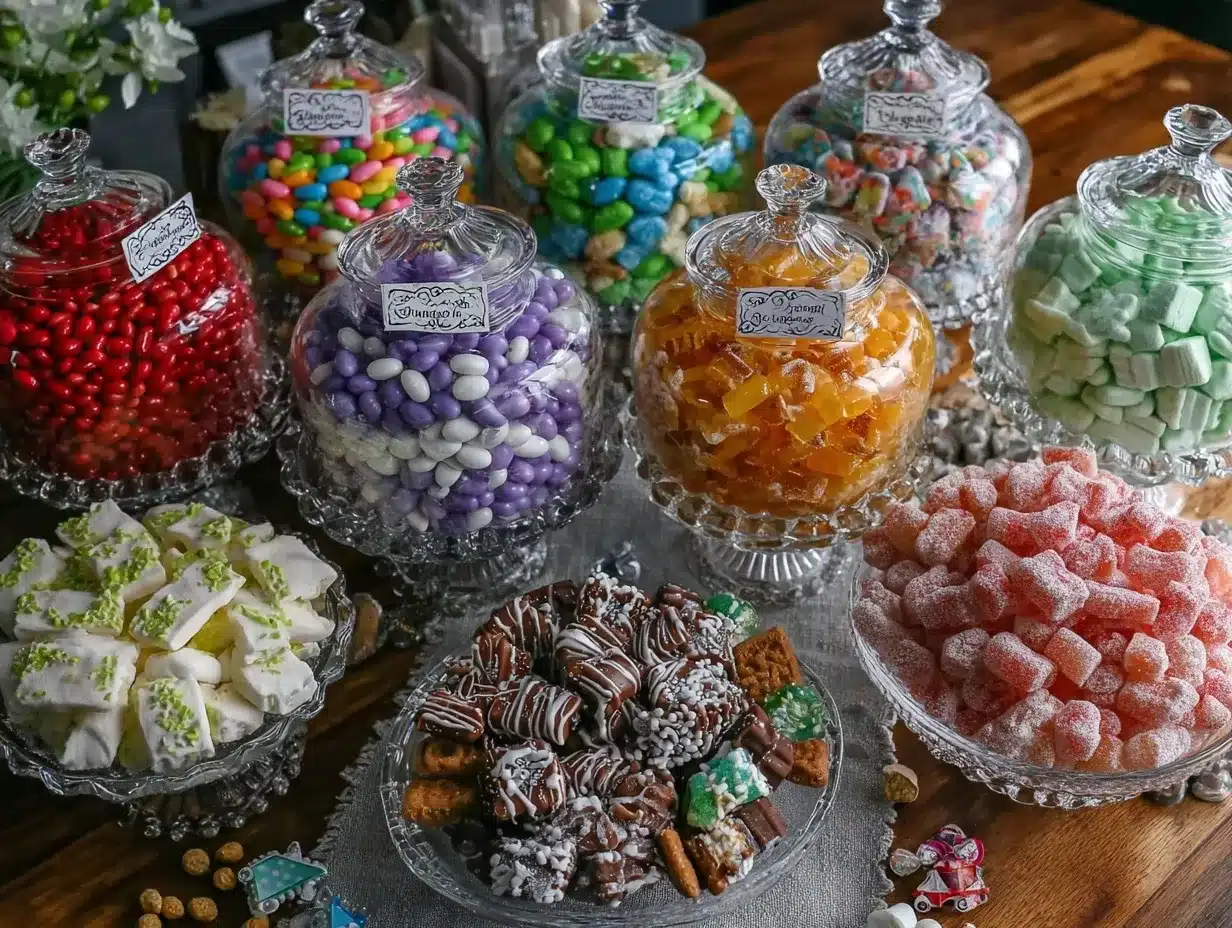
- Choose Your Location & Table (15 minutes): Pick a spot with enough space for your guests to gather comfortably. I usually opt for a corner table near a power outlet if I want to add lights or a small fan to keep chocolate from melting.
- Prepare the Table Surface (10 minutes): Lay down your tablecloth or runner. Make sure it’s wrinkle-free for a polished look. Pro tip: Tape the edges under the table for a windproof setup if outdoors.
- Sort & Organize Candies & Desserts (20 minutes): Open candy bags and sort treats by type and color. Place smaller candies in jars, and keep wrapped or delicate items on plates or trays. This step is great for involving family or friends—it’s surprisingly fun to arrange sweets!
- Arrange Containers with Varying Heights (15 minutes): Use cake stands, boxes under the tablecloth, or stacked plates to create different levels. Placing taller items like lollipops at the back and shorter treats in front helps everything stay visible and inviting.
- Add Serving Tools & Labels (10 minutes): Place scoops, tongs, and small plates near each item. Use chalkboard tags or printable labels to name each treat. Don’t worry if your handwriting isn’t perfect—handmade charm adds personality.
- Finish with Decorative Touches (10 minutes): Sprinkle confetti, add small flower arrangements, or place LED string lights around the table edges for a festive vibe. These small details make a big difference in photos and atmosphere.
- Final Inspection & Adjustments (5 minutes): Step back and look for any gaps or clutter. Fill empty spaces with extra candy or dessert bites. Honestly, I sometimes forget a topping or two and have to improvise, but that’s part of the fun!
Throughout the setup, keep some extra napkins and a small trash bin nearby to handle wrappers and spills quickly. Remember, the goal is a beautiful display, but also one that’s easy to maintain during the party.
Cooking Tips & Techniques
Creating a successful candy and dessert bar is as much about presentation as it is about the treats. Here are some tips I’ve picked up along the way:
- Prep in Advance: Whenever possible, prepare or buy your desserts a day ahead. This avoids last-minute stress and lets flavors settle—cupcakes taste better after a few hours!
- Use Clear Containers: Transparency is key. Clear jars and bowls let the vibrant colors of your candy pop, making the table visually appealing and easier for guests to identify treats.
- Balance Sweetness: Include a few fresh or less sugary options like fruit skewers or nuts. This contrast helps guests pace themselves and keeps the spread from feeling overwhelming.
- Label Everything: Not just for allergies, but it adds a professional touch. Plus, it invites conversation—people love asking about the story behind a particular candy or dessert.
- Keep It Hygienic: Providing scoops and tongs prevents double-dipping, which is especially important in larger groups.
- Maintain Freshness: If your event runs long, cover sweets loosely with plastic wrap or clear lids to keep them from drying out.
I once made the mistake of placing chocolate candies in direct sunlight—big mess! Lesson learned: keep your candy bar in a shaded spot or indoors if possible. Also, when layering desserts like brownies and cupcakes, I find using decorative cupcake liners adds a neat, uniform look and makes cleanup easier.
Variations & Adaptations
Not every graduation party is the same, and your candy and dessert bar can reflect your grad’s unique style and dietary needs. Here are some options I’ve tried or heard rave reviews about:
- Diet-Friendly Options: Swap traditional candies for sugar-free or keto-friendly treats like dark chocolate almonds or coconut clusters. Gluten-free brownies and vegan cupcakes are easy to find or bake.
- Seasonal Themes: For spring or summer graduations, add fresh berries, pastel candy colors, or floral decorations. In winter, think peppermint sticks, red and white candies, and warm cookie bites.
- International Flavors: Incorporate treats from your family heritage or places your grad loves—like mochi balls, churros bites, or Italian biscotti.
- Interactive Elements: Consider adding a DIY s’mores station or a hot chocolate bar alongside the candy spread for extra fun and warmth.
- Personalized Touch: Use custom wrappers, themed signage, or include your grad’s favorite candy brands. One time, I made a “memory lane” candy jar with sweets from my grad’s childhood—a real hit!
Serving & Storage Suggestions
Serve your candy and dessert bar at room temperature for the best texture and flavor. If outdoors, keep chocolates shaded to avoid melting. I recommend placing the bar near the party’s main social area so guests can casually graze and mingle.
Complement the sweets with simple beverages like lemonade, iced tea, or a sparkling punch. For a grown-up twist, consider a coffee station or a festive mocktail bar nearby.
Leftovers? No worries! Most candies keep well stored in airtight containers at room temperature for up to two weeks. Desserts like cupcakes and brownies do best refrigerated and can be frozen for up to three months. When reheating brownies, a quick 10-second zap in the microwave brings back that fresh-baked warmth.
Over time, flavors of certain treats (like chocolate-covered nuts) deepen, making for even better snacking the next day. Just be sure to store everything separately to preserve textures and prevent sogginess.
Nutritional Information & Benefits
While this candy and dessert bar is all about celebration and indulgence, it’s good to be mindful of portions and balance. Here’s a rough nutritional snapshot per serving (one cupcake or handful of candy):
- Calories: 150-250 kcal
- Fat: 7-12 grams
- Sugar: 15-25 grams
- Protein: 1-3 grams
Key ingredients like nuts and fresh fruit add some nutritional value and can help moderate blood sugar spikes. For guests with dietary restrictions, offering gluten-free or dairy-free options ensures everyone can enjoy the festivities.
I’ve always seen this setup as a way to celebrate milestones with joy and moderation, reminding myself and others that treats are part of life’s sweetest moments. That mindset keeps the party lighthearted and inclusive.
Conclusion
Creating the perfect DIY graduation party candy and dessert bar is less about perfection and more about bringing joy, color, and sweetness to your celebration. Whether you’re throwing a small gathering or a big bash, this setup is adaptable, approachable, and guaranteed to delight.
I love this method because it’s relaxed but thoughtfully put together—plus, it takes the stress out of party prep. You can customize every detail to your grad’s tastes and your party’s vibe, making it truly your own.
Give it a try, and don’t hesitate to share your own twists or questions below. Remember, the best celebrations come with laughter, a little mess, and plenty of sweet memories. Here’s to your next unforgettable party!
FAQs
What’s the best way to keep candy fresh during an outdoor party?
Keep candies in shaded areas and use covered containers when possible. Avoid direct sunlight and consider setting up under a tent or canopy.
Can I prepare the dessert bar a day in advance?
Absolutely! Most candies and desserts hold up well overnight when stored properly. Assemble the display the day of for the freshest look.
How do I accommodate guests with allergies?
Label treats clearly and offer allergen-free options like gluten-free cupcakes or nut-free candies. Keeping these separate helps prevent cross-contamination.
What containers work best if I don’t have specialty jars?
Clear bowls, mason jars, or even clean, repurposed glass containers from your kitchen work great. Mixing sizes adds visual interest too.
How much candy and dessert should I prepare per guest?
Plan on about ¾ cup of candy and one to two dessert pieces per person. Adjust based on your guest list and other food served at the party.
For more ideas on party treats and easy entertaining, you might enjoy my guide on crispy garlic chicken or the colorful summer fruit punch recipes that pair perfectly with sweet spreads like this.
PrintPerfect DIY Graduation Party Candy and Dessert Bar Setup Ideas for Easy Celebrations
Create a fun, colorful, and memorable candy and dessert bar for graduation parties with simple ingredients and easy setup tips. Perfect for last-minute celebrations and customizable to any party theme.
- Prep Time: 1 hour 25 minutes
- Cook Time: 0 minutes
- Total Time: 1 hour 25 minutes
- Yield: Varies depending on guest count; plan about 3/4 cup of candy and 1-2 dessert pieces per person
- Category: Party Setup
- Cuisine: American
Ingredients
- Assorted gummy candies (e.g., bears, worms, fruit slices)
- Chocolate-covered nuts or raisins
- Hard candies (like lollipops or peppermint sticks)
- Mini candy bars or individually wrapped chocolates
- Homemade or store-bought cupcakes (vanilla with buttercream frosting recommended)
- Brownie bites or cookie bars
- Rice Krispies treats
- Fresh fruit skewers
- Clear glass jars or bowls in various sizes
- Small dessert plates and napkins
- Colorful scoops and tongs
- Labels or chalkboard tags
Instructions
- Choose a location and table with enough space for guests (15 minutes).
- Prepare the table surface by laying down a wrinkle-free tablecloth or runner (10 minutes).
- Sort and organize candies and desserts by type and color, placing smaller candies in jars and wrapped items on plates or trays (20 minutes).
- Arrange containers with varying heights using cake stands, boxes, or stacked plates to create visual interest (15 minutes).
- Add serving tools like scoops, tongs, and small plates near each item; label each treat with chalkboard tags or printable labels (10 minutes).
- Finish with decorative touches such as confetti, small flower arrangements, or LED string lights (10 minutes).
- Perform a final inspection and adjust by filling any gaps with extra candy or dessert bites (5 minutes).
Notes
[‘Prepare or buy desserts a day ahead to reduce stress and improve flavor.’, ‘Use clear containers to showcase colorful candies.’, ‘Include fresh or less sugary options like fruit skewers to balance sweetness.’, ‘Label treats clearly for allergy awareness and added charm.’, ‘Keep candy bar shaded or indoors to prevent chocolate melting.’, ‘Cover sweets loosely with plastic wrap if event runs long to maintain freshness.’, ‘Use decorative cupcake liners for neat presentation and easier cleanup.’, ‘Store leftover candies in airtight containers at room temperature for up to two weeks.’, ‘Refrigerate desserts like cupcakes and brownies; freeze for up to three months if needed.’]
Nutrition
- Serving Size: One cupcake or a han
- Calories: 150250
- Sugar: 1525
- Fat: 712
- Protein: 13
Keywords: graduation party, candy bar, dessert bar, DIY party setup, easy celebration, party treats, candy display, dessert ideas