Love this? Save it for later!
Share the inspiration with your friends
“It was the Fourth of July, and honestly, I wasn’t expecting much from my impromptu kitchen experiment,” I remember telling my friend as we stood in my cramped, sunlit apartment kitchen. The heat outside was relentless, and the thought of firing up the oven was laughable. I had a bag of frozen raspberries, a stack of lemons from a farmer’s market haul, and a stubborn craving for something cold and bright to beat the summer scorch. So, I grabbed a few popsicle molds, mixed up a little magic, and ended up with what I now call my Refreshing Red White and Blue Firecracker Lemon Raspberry Popsicles.
What’s funny is that the popsicles weren’t supposed to be a big deal — just a simple summer treat to cool down. But that first bite, the zing from the lemon paired with the sweet-tart burst of raspberry, layered with a subtle creamy swirl, stopped me in my tracks. Maybe you’ve been there, where a simple recipe turns into a new obsession. I did forget to put the sticks in on the first try (classic kitchen chaos), but that only made the successful batch taste sweeter. These popsicles have since become my go-to for backyard barbecues, last-minute gatherings, and those lazy afternoons when the sun is just too much to handle.
Let me tell you, these popsicles are not just colorful—they’re a little celebration in every bite, perfect for anyone who loves a fresh, fruity kick in their summer snacks. And the best part? They’re ridiculously easy to make, with ingredients that are probably already chilling in your fridge. Stick around, and I’ll walk you through everything you need to whip up these fireworks on a stick!
Why You’ll Love This Recipe
This Refreshing Red White and Blue Firecracker Lemon Raspberry Popsicles recipe is a summer game-changer. Having tested countless fruity popsicle combos over the years, I can confidently say this one hits all the right notes for busy days and festive occasions alike.
- Quick & Easy: Ready in under 30 minutes plus freezing time—perfect for those spontaneous cravings or last-minute parties.
- Simple Ingredients: No fancy or hard-to-find items here. Just fresh lemons, frozen raspberries, a touch of honey, and a splash of coconut milk to create that creamy dimension.
- Perfect for Summer Celebrations: Whether it’s a neighborhood barbecue, a pool day, or an Independence Day bash, these popsicles bring the perfect patriotic flair.
- Crowd-Pleaser: Kids, adults, and picky eaters alike go crazy for the balance of tangy and sweet, plus that fun layered look.
- Unbelievably Delicious: The contrast of tart lemon and sweet raspberry combined with the smooth coconut swirl turns each bite into a refreshing party in your mouth.
What sets this recipe apart? The layering technique creates a vibrant red, white, and blue pattern that’s as fun to look at as it is to eat. Plus, using coconut milk instead of heavy cream keeps it light but still creamy, a little trick I picked up during a tropical vacation that I swear by now. Honestly, this isn’t just any summer popsicle—it’s the kind that makes you pause, smile, and maybe even do a little happy dance in your kitchen.
What Ingredients You Will Need
This recipe relies on fresh and simple ingredients to deliver a bright, refreshing flavor without any fuss. Most of these are pantry or freezer staples, and you can swap a few based on what’s available.
- For the Red Layer:
- 1 ½ cups frozen raspberries (you can use fresh if in season for a brighter flavor)
- 2 tablespoons honey or maple syrup (adjust based on your sweetness preference)
- 1 tablespoon fresh lemon juice (adds a zesty kick)
- 2 tablespoons water (to help blend smoothly)
- For the White Layer:
- ¾ cup coconut milk (full-fat for creaminess; canned works best, I like Chaokoh)
- 1 tablespoon honey or agave syrup (balances the tartness)
- ½ teaspoon pure vanilla extract (optional, but adds depth)
- For the Blue Layer:
- ½ cup fresh or frozen blueberries (fresh gives a brighter taste, frozen is fine)
- 1 tablespoon honey or maple syrup
- 1 tablespoon water (to blend easily)
- 1 teaspoon fresh lemon juice (to brighten the flavor)
- Extras:
- Popsicle molds and sticks
Substitution tips: If you prefer a dairy-free option beyond coconut milk, almond or oat milk works fine but might be less creamy. For sweeteners, swap honey with maple syrup or agave to keep it vegan-friendly. Also, if you want a sugar-free version, a simple stevia blend can work, but start with small amounts as it’s potent.
Equipment Needed
- Popsicle molds: Essential for shaping your popsicles. I use silicone molds because they make unmolding a breeze, but plastic ones work too.
- Blender or food processor: Needed to puree the fruit layers smoothly. A handheld immersion blender can work if you don’t have a full blender.
- Measuring cups and spoons: To keep your layers balanced and sweetened just right.
- Mixing bowls: For prepping each layer separately.
- Freezer space: Make sure you have enough room to lay the molds flat for at least 4 hours.
If you don’t have popsicle molds, small paper cups with wooden sticks work in a pinch—I’ve done that on a lazy Sunday. Just cover the cups with foil and poke sticks through to hold them upright. Also, silicone molds are dishwasher friendly, which I appreciate when cleaning up after an enthusiastic popsicle-making session!
Preparation Method
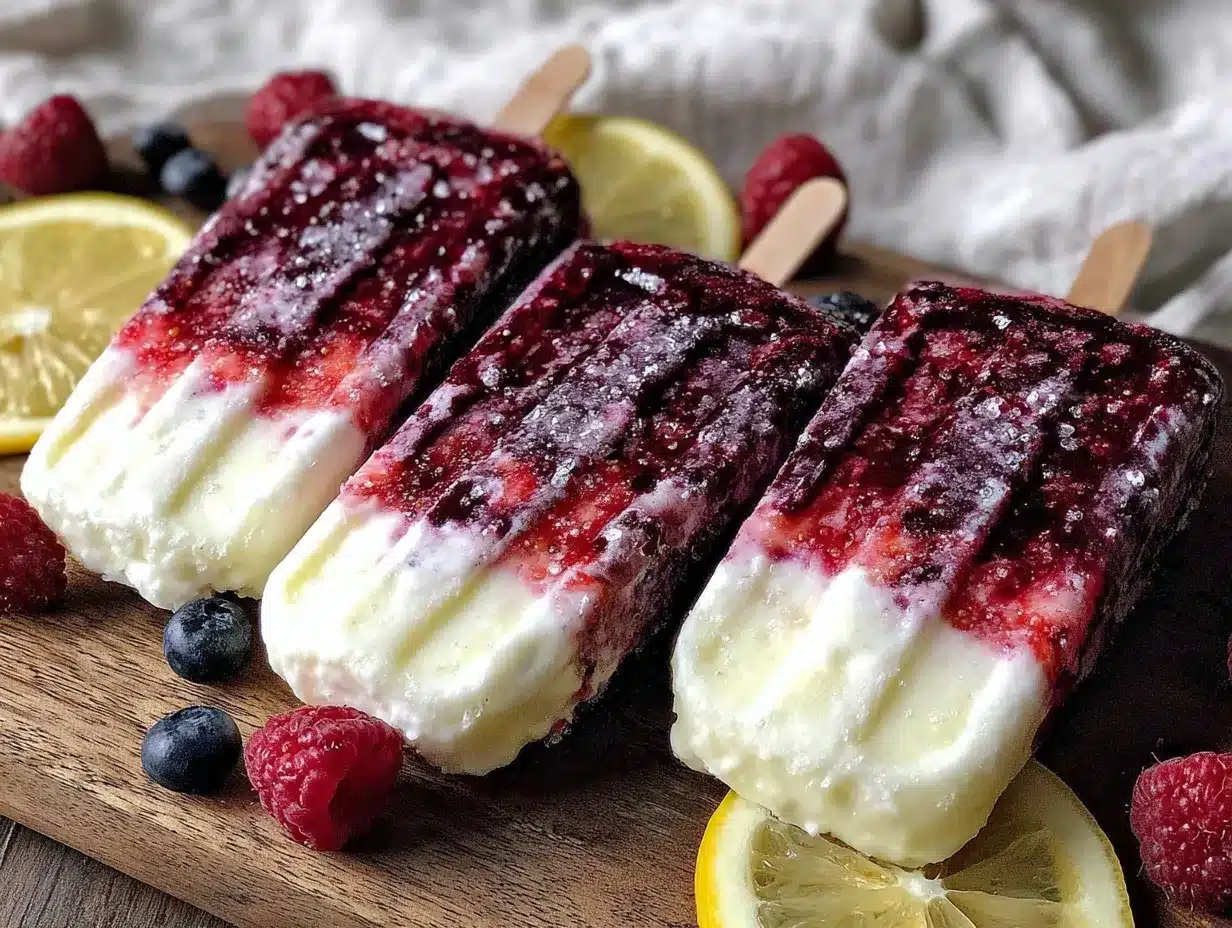
- Make the red raspberry layer: Combine frozen raspberries, honey, lemon juice, and water in your blender. Blend until smooth but still slightly textured. Taste and adjust sweetness if needed. Pour about ⅓ cup into each popsicle mold, filling just enough for the bottom layer. Freeze for 30-45 minutes until firm to the touch but not rock solid.
- Prepare the white coconut layer: In a bowl, whisk together coconut milk, honey, and vanilla extract until well combined. Remove the molds from the freezer and gently pour this mixture over the frozen red layer. Tap the molds lightly to settle the liquid evenly. Return to freezer for another 30-45 minutes until firm.
- Blend the blue blueberry layer: Blend blueberries, honey, lemon juice, and water until smooth. Pour this over the white layer, filling the molds almost to the top. Insert popsicle sticks now, pressing them straight down so they stand upright. Freeze for at least 4 hours or overnight for best results.
- Unmolding tips: To remove popsicles, run warm water over the outside of the molds for 10-15 seconds. Gently wiggle the sticks to loosen. Be patient—you don’t want to break your beautiful layers!
Note: The freezing times are approximate and depend on your freezer’s strength. I learned the hard way that rushing this step leads to slushy popsicles instead of those perfect, crisp layers. Also, be mindful not to overfill the molds, or the layers will blend too much, losing that striking red-white-blue effect.
Cooking Tips & Techniques
Mastering layered popsicles can feel a bit intimidating, but trust me, a few tricks make all the difference. First, chilling each layer before adding the next helps keep those clean, distinct colors without running together. I learned this after one too many blurry layers from impatience.
When blending the fruit, aim for a texture just smooth enough to pour but not paper-thin. If it’s too watery, the popsicles freeze icy instead of creamy. Adding a little natural sweetener balances the tartness, especially with raspberries and blueberries, which can be surprisingly sharp.
Also, lemon juice is your secret weapon. It brightens every layer and keeps the fruit flavors popping, but don’t overdo it—too much acid can curdle the coconut milk or overwhelm the taste.
For easy unmolding, silicone molds really are a lifesaver. If you’re stuck with plastic, warming the outside with your hands or a damp cloth helps. And if you’re making these with kids (I have!), prepping ingredients beforehand and letting them pour layers is a fun, mess-friendly way to get them involved.
Variations & Adaptations
- Dietary tweaks: Swap coconut milk with almond or oat milk for a milder flavor or to avoid coconut allergies. Use maple syrup instead of honey to keep it vegan.
- Flavor twists: Add fresh mint or basil to the raspberry layer for a herbal lift. Or, mix in a little ginger juice with the lemon for a spicy zing.
- Seasonal swaps: In winter, try pomegranate seeds instead of raspberries and use orange juice in place of lemon for a cozy citrus vibe.
- Cooking method adjustment: No popsicle molds? Use small muffin tins with paper liners and wooden sticks, freezing longer to ensure firmness.
- Personal variation: I once added a thin layer of crushed graham crackers between the white and blue layers for a fun crunchy surprise—like a hidden firecracker!
Serving & Storage Suggestions
Serve these popsicles straight from the freezer for the crispiest texture and brightest flavor. They’re perfect as a colorful refresher during outdoor gatherings or a cheeky afternoon pick-me-up. I like to place them on a platter lined with fresh mint leaves or edible flowers for a festive touch.
If you’re pairing, light sparkling lemonade or iced herbal tea complement the citrus-berry flavors wonderfully. For a snack, they go great alongside crispy garlic chicken or a fresh summer salad.
Store popsicles in an airtight container or freezer bag to prevent freezer burn and keep flavors pure. They’ll keep well for up to 2 weeks, but honestly, they rarely last that long in my house. Reheat by letting them sit at room temperature for a few minutes before enjoying.
Fun fact: the flavors actually mellow and deepen if you leave them overnight after freezing, so sometimes I make these a day ahead to let all the layers settle and marry beautifully.
Nutritional Information & Benefits
Each popsicle roughly contains:
| Calories | 90-110 kcal |
|---|---|
| Carbohydrates | 18-22g (mostly natural sugars) |
| Fat | 3-5g (from coconut milk) |
| Protein | 1-2g |
| Fiber | 2-3g |
These popsicles are naturally gluten-free, dairy-free, and vegan-friendly if you swap honey for maple syrup. The berries offer antioxidants and vitamin C, while the lemon boosts immunity and digestion. Coconut milk provides healthy fats that keep you satisfied without weighing you down. From a wellness standpoint, they’re a smart, guilt-free indulgence that keeps you hydrated and happy during sweltering summer days.
Conclusion
So, there you have it—my Refreshing Red White and Blue Firecracker Lemon Raspberry Popsicles recipe. It’s a simple, fun way to bring a burst of summer joy to your kitchen and your taste buds. Whether you’re hosting a holiday event, need a quick cool-down snack, or just want to treat yourself to some homemade goodness, this recipe fits the bill.
Honestly, I love how customizable and forgiving it is, so feel free to tweak the fruit or sweetness levels to make it your own. And if you do make them, please pop back here and tell me how it went—or your creative spin on the recipe. I’d love to hear!
Here’s to sunny days, colorful popsicles, and a summer filled with good eats and great memories.
FAQs
Can I make these popsicles without a blender?
If you don’t have a blender, you can mash the fruit with a fork or potato masher, but the texture will be chunkier. For smoother popsicles, blending is best.
How long do these popsicles last in the freezer?
Stored properly in an airtight container, they keep their best quality for up to two weeks. After that, they may develop freezer burn or lose flavor.
Can I use fresh fruit instead of frozen?
Absolutely! Fresh fruit will give a brighter taste but may require adding more water or a little ice to get the right texture for freezing.
What’s the best way to prevent popsicles from melting too quickly?
Serve them immediately after removing from the freezer, and keep them chilled until just before eating. Using full-fat coconut milk also helps maintain firmness longer.
Are these popsicles suitable for kids?
Yes! They’re naturally sweetened and colorful, making them a hit with kids. Just watch the honey amount for toddlers under one year old, as honey is not recommended for infants.
Pin This Recipe!
Refreshing Red White and Blue Firecracker Lemon Raspberry Popsicles
A vibrant and easy-to-make summer treat featuring layered lemon, raspberry, and blueberry flavors with a creamy coconut swirl. Perfect for cooling down on hot days and festive occasions.
- Prep Time: 15 minutes
- Cook Time: 4 hours 30 minutes
- Total Time: 4 hours 45 minutes
- Yield: 6 popsicles 1x
- Category: Dessert
- Cuisine: American
Ingredients
- 1 ½ cups frozen raspberries
- 2 tablespoons honey or maple syrup
- 1 tablespoon fresh lemon juice
- 2 tablespoons water
- ¾ cup full-fat coconut milk
- 1 tablespoon honey or agave syrup
- ½ teaspoon pure vanilla extract (optional)
- ½ cup fresh or frozen blueberries
- 1 tablespoon honey or maple syrup
- 1 tablespoon water
- 1 teaspoon fresh lemon juice
- Popsicle molds and sticks
Instructions
- Make the red raspberry layer: Combine frozen raspberries, honey, lemon juice, and water in your blender. Blend until smooth but still slightly textured. Taste and adjust sweetness if needed. Pour about ⅓ cup into each popsicle mold, filling just enough for the bottom layer. Freeze for 30-45 minutes until firm to the touch but not rock solid.
- Prepare the white coconut layer: In a bowl, whisk together coconut milk, honey, and vanilla extract until well combined. Remove the molds from the freezer and gently pour this mixture over the frozen red layer. Tap the molds lightly to settle the liquid evenly. Return to freezer for another 30-45 minutes until firm.
- Blend the blue blueberry layer: Blend blueberries, honey, lemon juice, and water until smooth. Pour this over the white layer, filling the molds almost to the top. Insert popsicle sticks now, pressing them straight down so they stand upright. Freeze for at least 4 hours or overnight for best results.
- To remove popsicles, run warm water over the outside of the molds for 10-15 seconds. Gently wiggle the sticks to loosen. Be patient to avoid breaking the layers.
Notes
Chill each layer before adding the next to keep colors distinct. Use full-fat coconut milk for creaminess. Run warm water on molds to ease unmolding. Adjust sweetness to taste. Fresh fruit can be used but may require more water or ice. Store popsicles in airtight container for up to 2 weeks.
Nutrition
- Serving Size: 1 popsicle
- Calories: 90110
- Sugar: 1518
- Sodium: 510
- Fat: 35
- Saturated Fat: 23
- Carbohydrates: 1822
- Fiber: 23
- Protein: 12
Keywords: popsicles, summer treats, lemon raspberry, blueberry, coconut milk, layered popsicles, patriotic dessert, easy popsicles, healthy snacks, vegan popsicles


